Debugging LiteMage Cache
It is recommended to first deploy LiteMage Cache on a non-production environment for testing/debugging before deploying it on your production site. If you have to test LiteMage on your live site, you can enable LiteMage for only a few IPs during testing. Please disable all other full page caches as they will likely conflict with LiteMage.
How to check if a page is served from LiteMage Cache
Use your browser's developer tool to check the response header for the HTML file. This can usually be done by right clicking on the page and selecting some form of “Inspect”. Then click on the “Network” tab in the inspector and reload the page. If you see “X-LiteSpeed-Cache: hit,litemage” in the response header for the HTML file(usually listed first), then the page is being served by LiteMage Cache.
How to enable the debug log
- From the Magento Admin Panel: Navigate to System → Configuration and under “Advanced” in the left side menu, click “Developer”. Under “Log Settings” set “Enabled” to “Yes”. Make sure it is enabled within the store's scope as well.
- From the Magento Admin Panel: Navigate to System → Configuration and under “LITEMAGE CACHE” in the left side menu, click “LiteMage Configuration”. Under “Developer Testing” set “Enable Debug” to “Yes”.
system.log will now be generated in magento_installation_directory/var/log.
Enable LiteMage for only certain IPs for testing/troubleshooting purposes
It is recommended to enable LiteMage Cache for only certain IPs when troubleshooting. To do this, from the Magento Admin Panel, navigate to System → Configuration and in the left side menu under “LITEMAGE CACHE” click “LiteMage Configuration”. Under “Developer Testing” add the desired IPs to the “Enable LiteMage Cache Only for Listed IPs” field.
Add your IP to Admin IPs to easily perform certain actions via browser
For information on privileged browser commands, see our LiteMage Cache Administration page.
How to temporarily turn off LiteMage for certain URLs in browser
You may want to confirm whether or not an issue on a particular site is being caused by LiteMage Cache being enabled but do not want to disable LiteMage Cache for everyone. You can do this by adding the GET parameter “LITEMAGE_DEBUG=NOCACHE” to the site's URL which will cause the page to not be served by LiteMage (available since 1.0.2).
For example: Enable LiteMage cache for your store and test the following URL:
http://your-magento-domainname/home-decor/books-music/alice-in-wonderland.html
Check the HTML response header for “X-LiteSpeed-Cache: hit,litemage”, as detailed in “How to check if a page is served from LiteMage Cache” above.
Now to see the same page not being served by LiteMage, simply append “?LITEMAGE_DEBUG=NOCACHE” to the end of any URL. For example:
http://your-magento-domainname/home-decor/books-music/alice-in-wonderland.html?LITEMAGE_DEBUG=NOCACHE
This will retrieve the current page from the backend, bypassing LiteMage Cache. When checking the HTML response header for the page, “X-LiteSpeed-Cache: hit,litemage” should no longer be listed.
This is useful for checking the accuracy of the currently cached version of a page and also the quickest way to debug LiteMage for specific URLs.
How to check if ESI block holes are being properly punched
From LiteMage Extension 1.0.2 onward, you can display holes punched during the ESI process by adding the GET parameter “LITEMAGE_DEBUG=SHOWHOLES”. This is useful for checking if all private blocks are being properly hole punched by LiteMage.
To do this, navigate to System > Configuration > LITEMAGE CACHE > LiteMage Configuration and either set Enable Debug to “Yes” in the “Developer Testing” section under , add your IP address to the list in Enable LiteMage Cache Only for Listed IPs in the same section, or add your IP address to the list in Admin IPs under the “General Settings” section.
You Should now be able to append “?LITEMAGE_DEBUG=SHOWHOLES” to the end of any LiteMage enabled URL and the injected blocks on the page will now be highlighted except for valueOnly blocks.
For example:
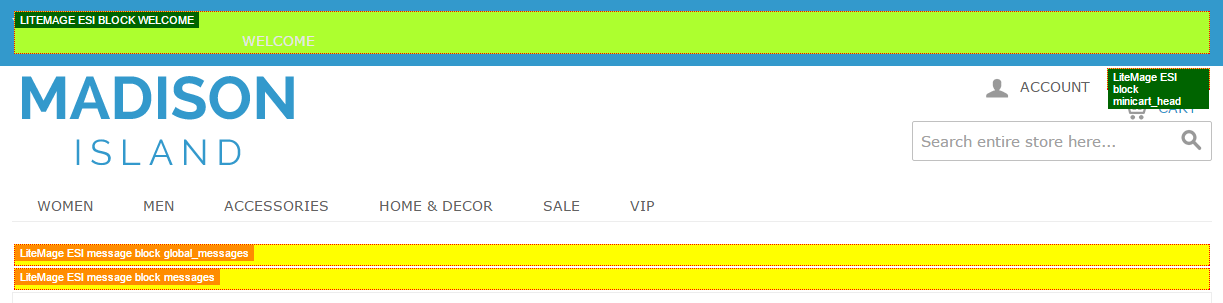
Note: If used, it is recommended to set Enable Debug back to “No” when finished.
Need Additional Support?
For extensions that need some tweaking before being used with LiteMage, visit our Supported 3rd Party Extensions page.
If you need any additional support or help installing, configuring, or troubleshooting LiteMage for your Magento store, have a look at our LiteMage Support page.