This is an old revision of the document!
LSCWP Configuration Settings
General Settings
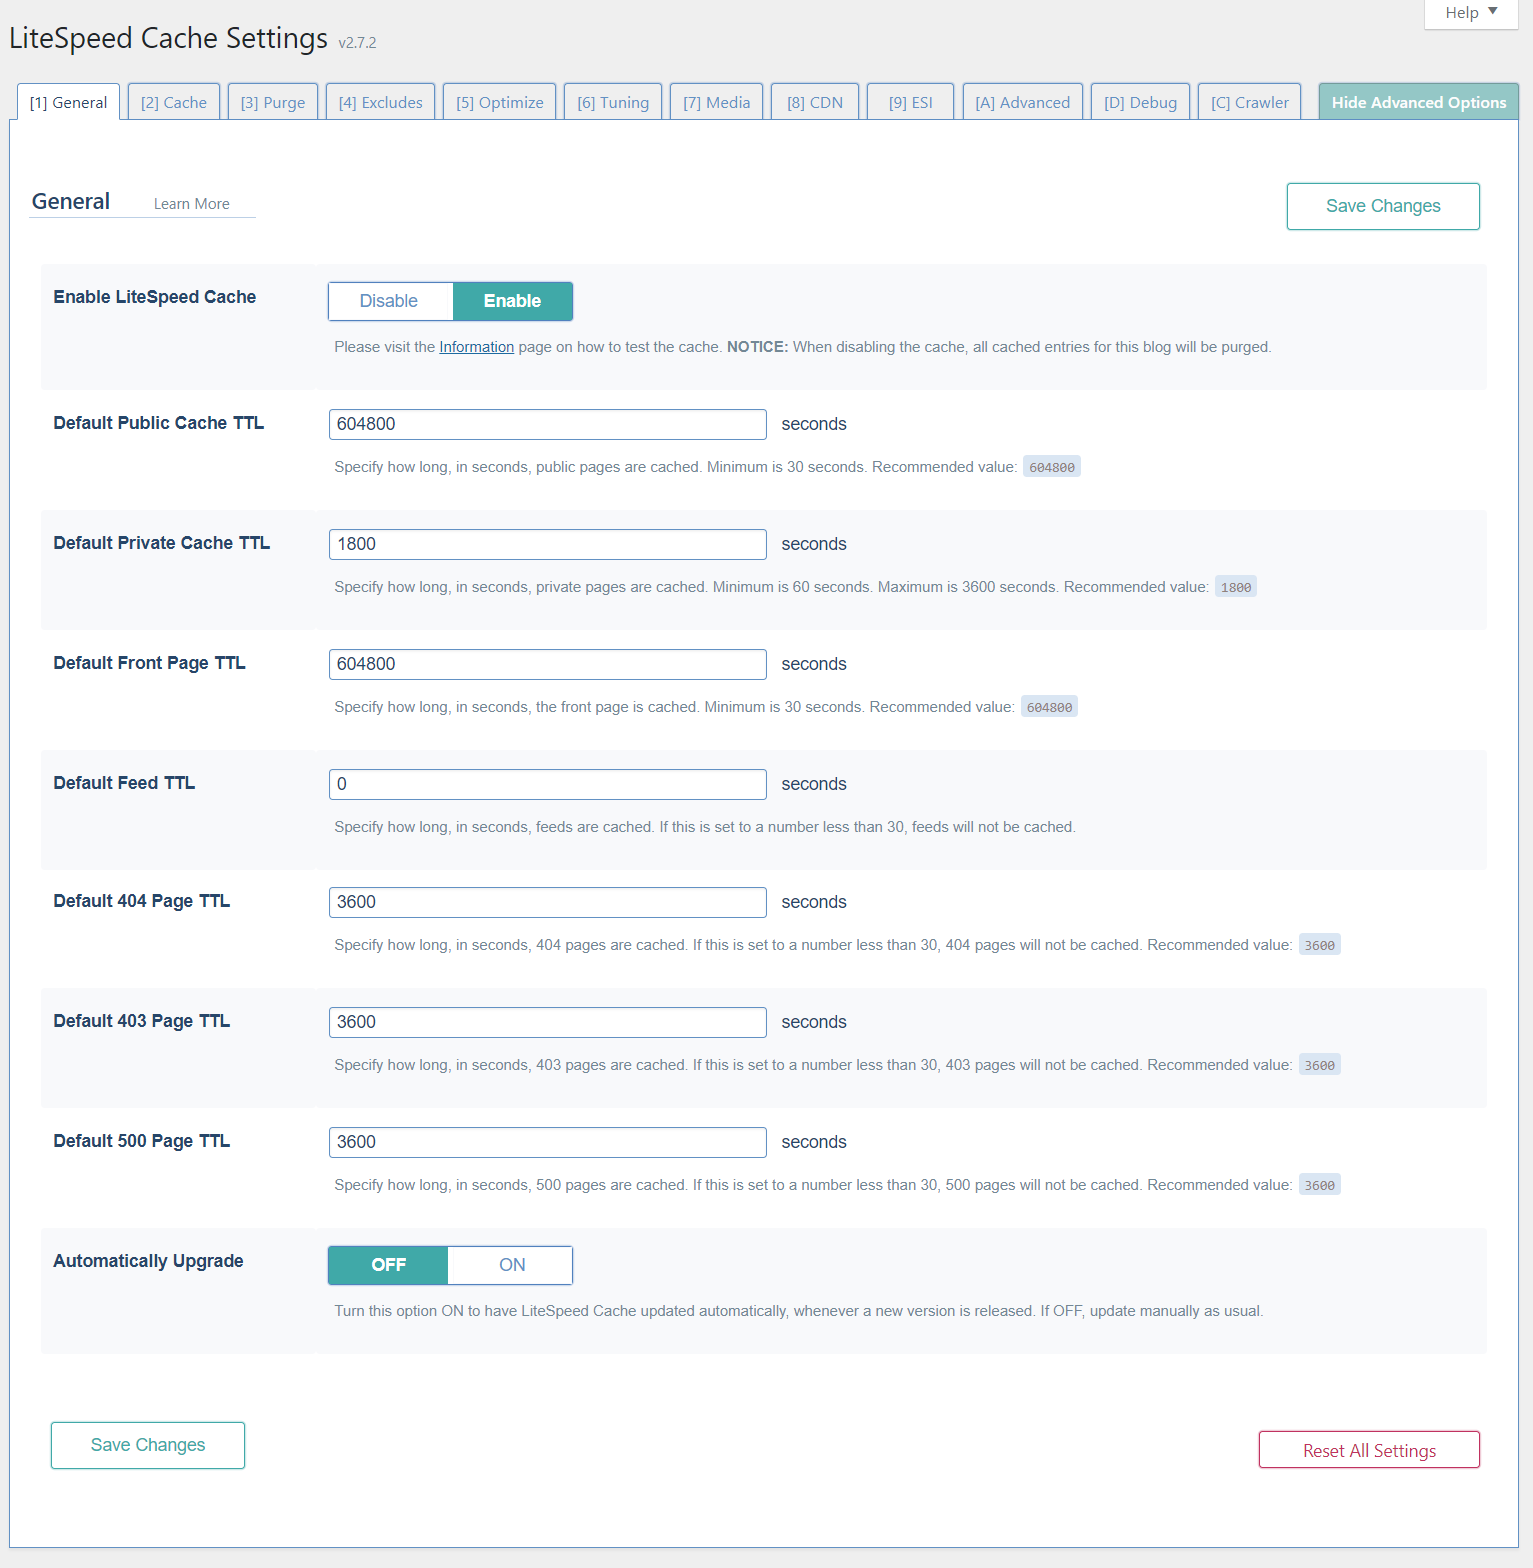
Enable LiteSpeed Cache
Enable/Disable/(Use Network Admin Setting)
This is the third and final level for enabling the plugin. When enabled, the cache plugin will cache pages. Disabling will stop any caching from occurring and purge the cache of all WordPress cache entries.
For single site installations, only Enable and Disable are available. For Multisite Subsite admins, there is a third option, Use Network Admin Setting. This last option uses what the Network Admin chooses.
Default Public Cache TTL
28800 30 or more.
This TTL setting controls most of the pages. All the other TTLs are for specific pages/types of pages.
The default value amounts to 8 hours. Other possible values are 1 hour (3600), 1 day (86400), 1 week (604800), etc. Since most of these pages will not change once posted, a longer TTL may be beneficial.
Default Private Cache TTL
1800 between 60 and 3600.
This TTL setting determines how long private pages are cached.
Default Front Page TTL
1800 30 or more.
This TTL setting controls the front page. Note that this can be triggered by the is_front_page() check or a third party plugin chose to use the front page TTL for the page (for example, the WooCommerce shop page).
The default value amounts to 30 minutes. The front page tends to be the most often updated page, but is also the page that most visitors will see. For these reasons, it may be more beneficial to use a short TTL. That said, if the site is not updated often, longer TTLs may be used.
Default Feed TTL
0 0 or more. 0 indicates do not cache, < 30 seconds will be set to 30.
This TTL setting controls the feeds. Feeds are a great way for readers to stay up to date on blog entries, but are generally set up to pull from the blog in intervals. However, this could cause a constant load on the server. Cached feed pages are purged on update and on comment, so they are guaranteed to remain up to date.
The default value is 0, for do not cache. If there are constant updates, it may not be worthwhile to set this up, because the cache will be purged constantly. However, it may still be beneficial to cache the entries for a limited time if there are a lot of readers updating by feed.
Default 404 TTL
3600 0 or more. 0 indicates do not cache, < 30 seconds will be set to 30.
This TTL controls the pages that return 404. This may be random URLs visited or intentional 404s, but all pages returning a 404 status will use this value.
The default value is 3600, for one hour. There is no real recommended value for this TTL because it depends on what happens to the site. If visiting 404 pages is a common occurrence, it may help to cache the page for at least a short period. If 404 pages are intentional, it may help to cache the page for a longer period of time, because it is an expected visit. One matter of concern is disk size. Since 404 is for not found, there are an unlimited amount of pages that could be cached. This could be detrimental for the disk usage.
Default 403 TTL
3600 0 or more. 0 indicates do not cache, < 30 seconds will be set to 30.
This TTL controls the pages that return 403.
The default value is 3600, for one hour. Pages returning 403 are usually intentional, so it may be worth while to have a longer TTL for this setting.
Default 500 TTL
3600 0 or more. 0 indicates do not cache, < 30 seconds will be set to 30.
500 Errors are a more severe error. Caching this page may mask an issue within WordPress, so that may not be desired.
The default value is 3600, for one hour.
Cache
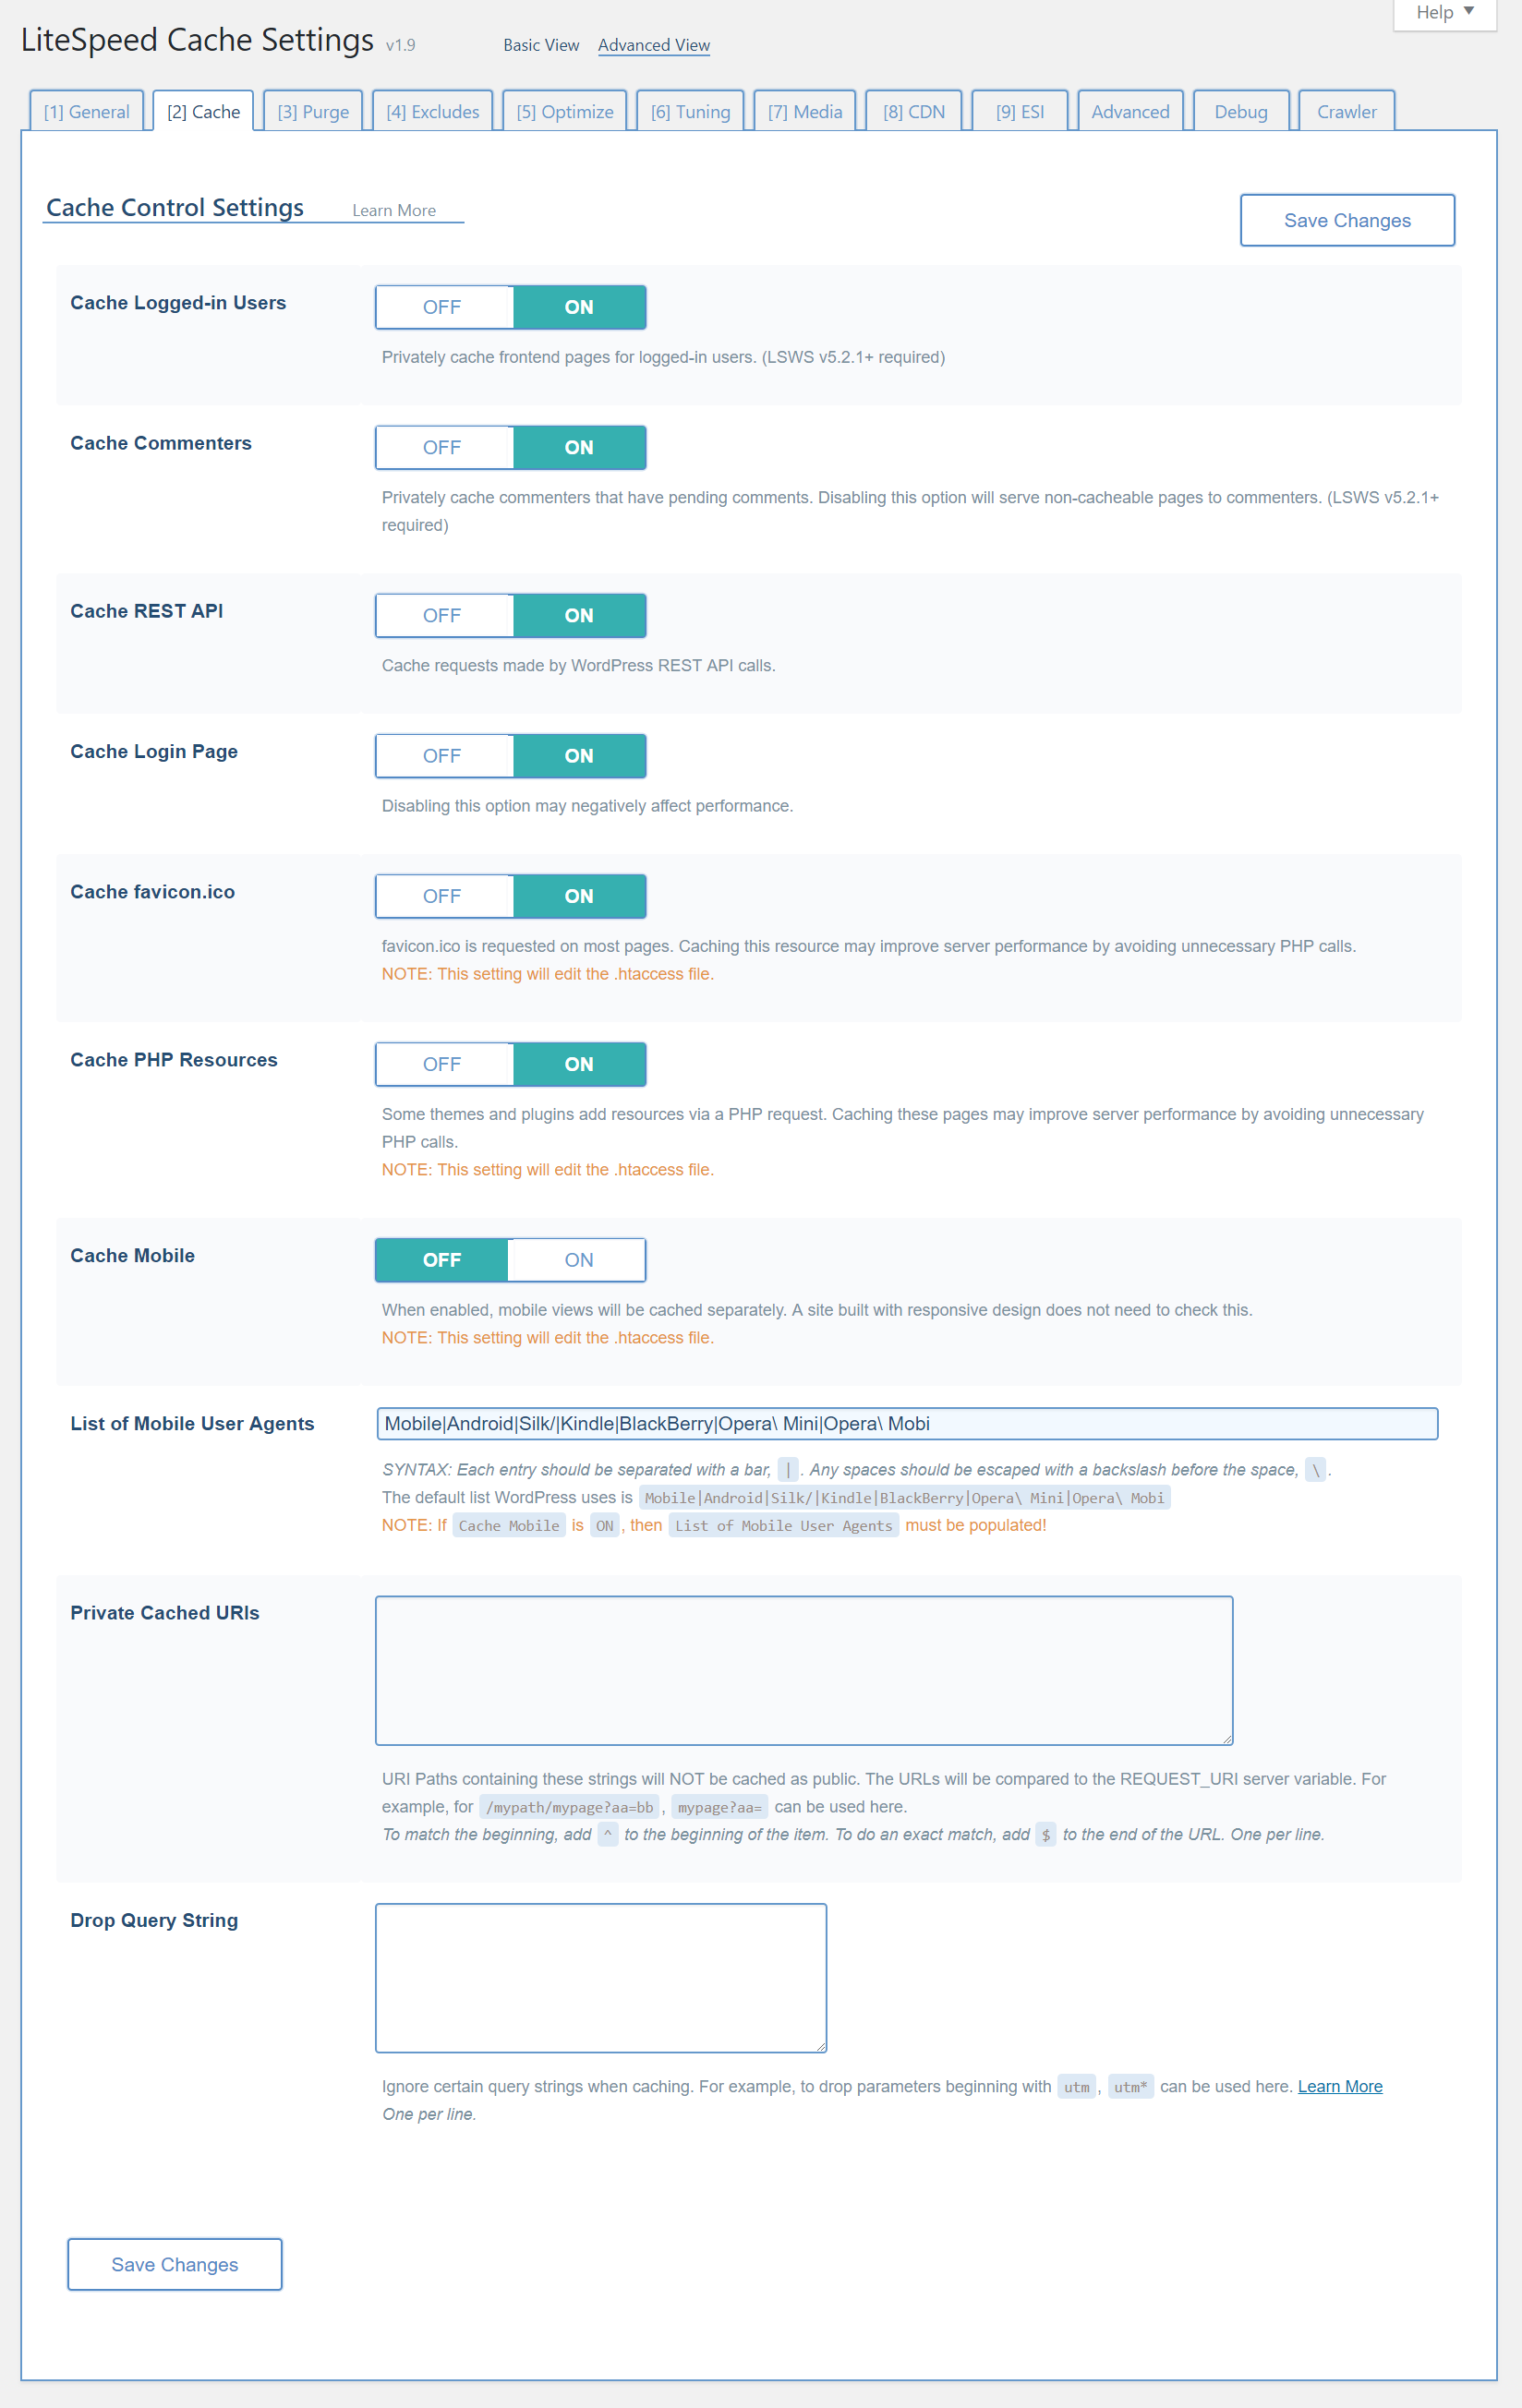
Cache Logged-in Users
checked
This setting allows content to be cached for logged-in users. Pages will be stored in private cache by IP/session ID.
Cache Commenters
checked
This option is useful for the WordPress option that requires moderation on guest comments. If that option is set, this option will serve the cached version of the page, meaning the commenters will not see their under moderation comments. If unchecked, commenters will not be served from cache.
Cache REST API
checked
This option allows you to cache requests that are made by WordPress REST API calls.
Cache Login Page
checked
This option will cache the login page. Normally, there is no reason to uncheck this option. However, if there is something that may identify a user on the page, this should be unchecked.
Cache favicon.ico
checked
This option will cache the favicon.ico response if it does not exist. The reason for caching this is because if the file does not exist, it will load WordPress every time. This will avoid that extra call.
Cache PHP Resources
checked
This option will cache any PHP resources loaded by themes. Generally speaking, these are css or js resources loaded in PHP. In most cases, these are static outputs, so there is no reason to load PHP every time. If they are in fact dynamic, this should be unchecked.
Cache Mobile
unchecked
This option enables users to display a separate html for mobile and desktop views. This is primarily used for non-responsive themes, but can also be used in situations where different widgets are loaded depending on browser type.
The list of Mobile View User Agents must not be empty when this is checked.
List of Mobile User Agents
disabled/string
If Cache Mobile is set to Disable, this text box will be grayed-out. Once enabled,
this list should be filled in with a rewrite-rule-friendly list of user agents.
SYNTAX: Each entry should be separated with a bar, '|'. Any spaces should be escaped with a backslash before the space, '\ '.
The default list WordPress uses is Mobile|Android|Silk/|Kindle|BlackBerry|Opera\ Mini|Opera\ Mobi
Purge
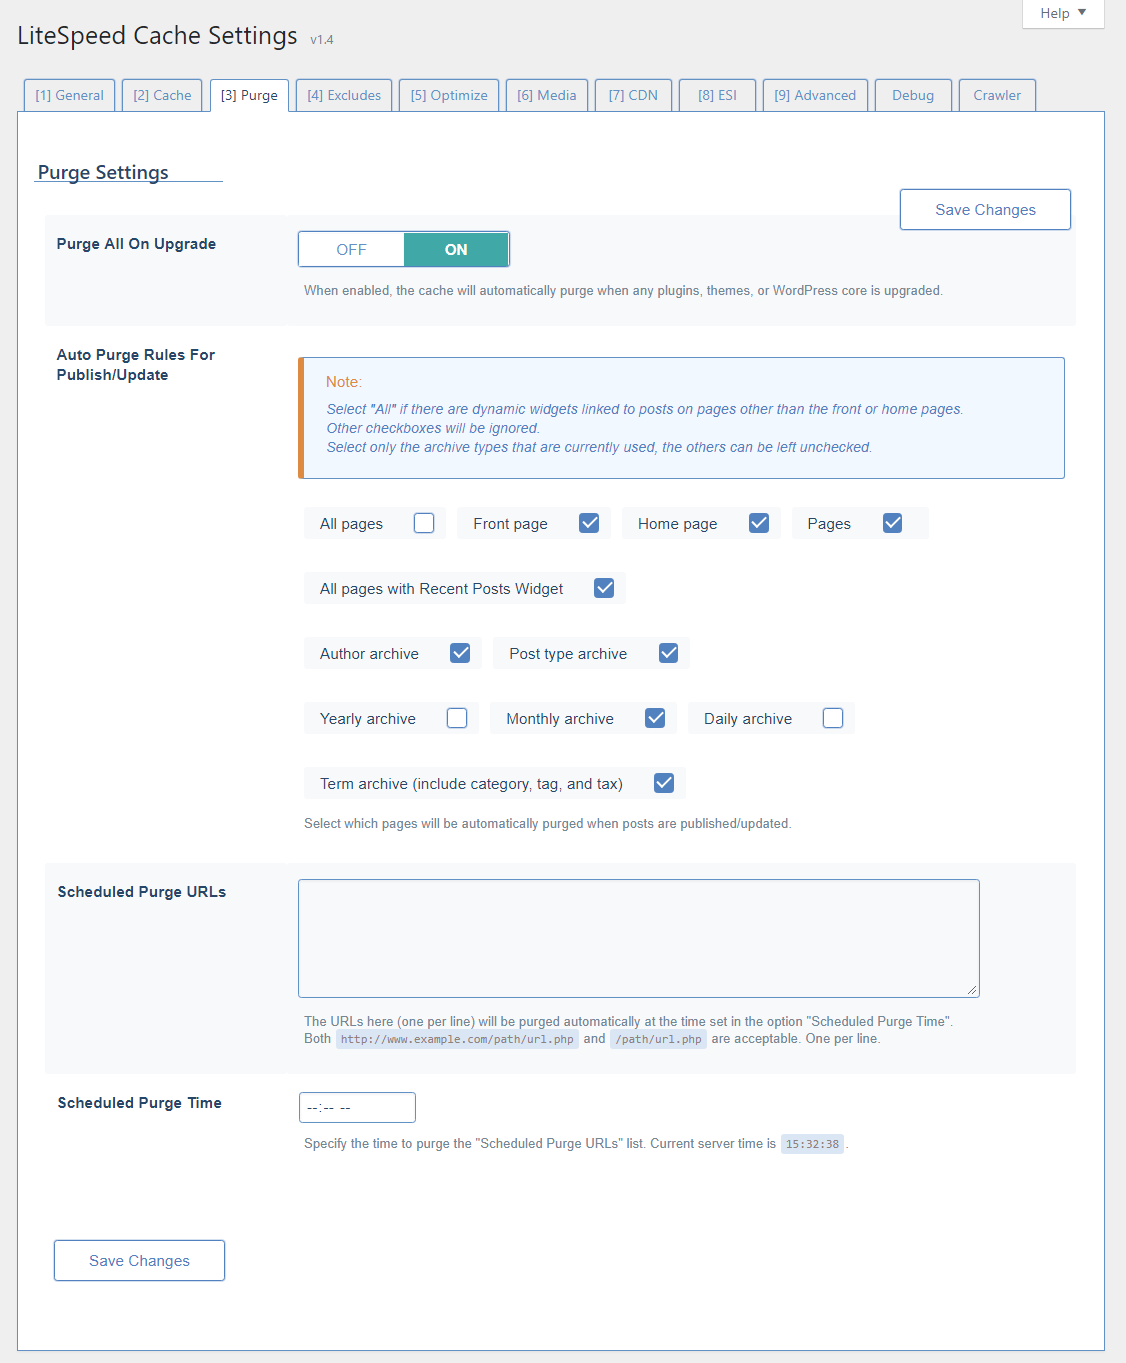
Purge All on upgrade
checked
This option selects whether to purge all pages on upgrade or not. As things make change across versions, it's highly recommended to leave this checked.
Auto Purge Rules For Publish/Update
When a post is published or updated, the post page is not the only one that changes. Category listings, tag listings. the blog’s front page, and a variety of archives may all also change. As such, you can specify which types of pages will be automatically purged every time a post is updated or created.
Which of these pages you choose is dependent on your theme and how posts are displayed on your site.
There is an option for All pages, which is disabled by default. When you enable this, all other checkboxes are ignored. Choosing the All pages option makes sense if you have dynamic post-related widgets which display on every page.
Scheduled Purge URLs
empty string
You can specify a list of URLs (one per line) that will be purged automatically at a certain time of day. This is not necessary under normal circumstances. LSCWP's sophisticated purge rules are able to handle most situations. If, however, you have content that is generated by an outside source, for example, you might want to purge the relevant pages every day to be sure the outside content is correctly displayed.
Scheduled Purge Time
Use this field in conjunction with the one above. If you've provided a list of URLs to purge, specify the time they should be purged here.
Excludes

URI List
empty string
This should be a list of WordPress URLs that should not be cached. LiteSpeed Cache understands that there are some situations that should not be cached already, such as the WooCommerce checkout page.
Category List
empty string
This is a list of category pages that should not be cached.
Tag List
empty string
This is a list of tag pages that should not be cached.
Cookie List
empty string
This is a list of cookies that should not be cached. Note that this means on the existence of the cookie.
User Agent List
empty string
This is a list of user agents that should not be cached. Note that this means on a partial match of the user agent.
ESI
To learn about ESI and the implications of enabling it in LSCWP, please see this wiki. Please note: ESI is not available with OpenLiteSpeed. You need LiteSpeed Web Server Enterprise edition or LiteSpeed Web ADC in order to use ESI.
Enable ESI
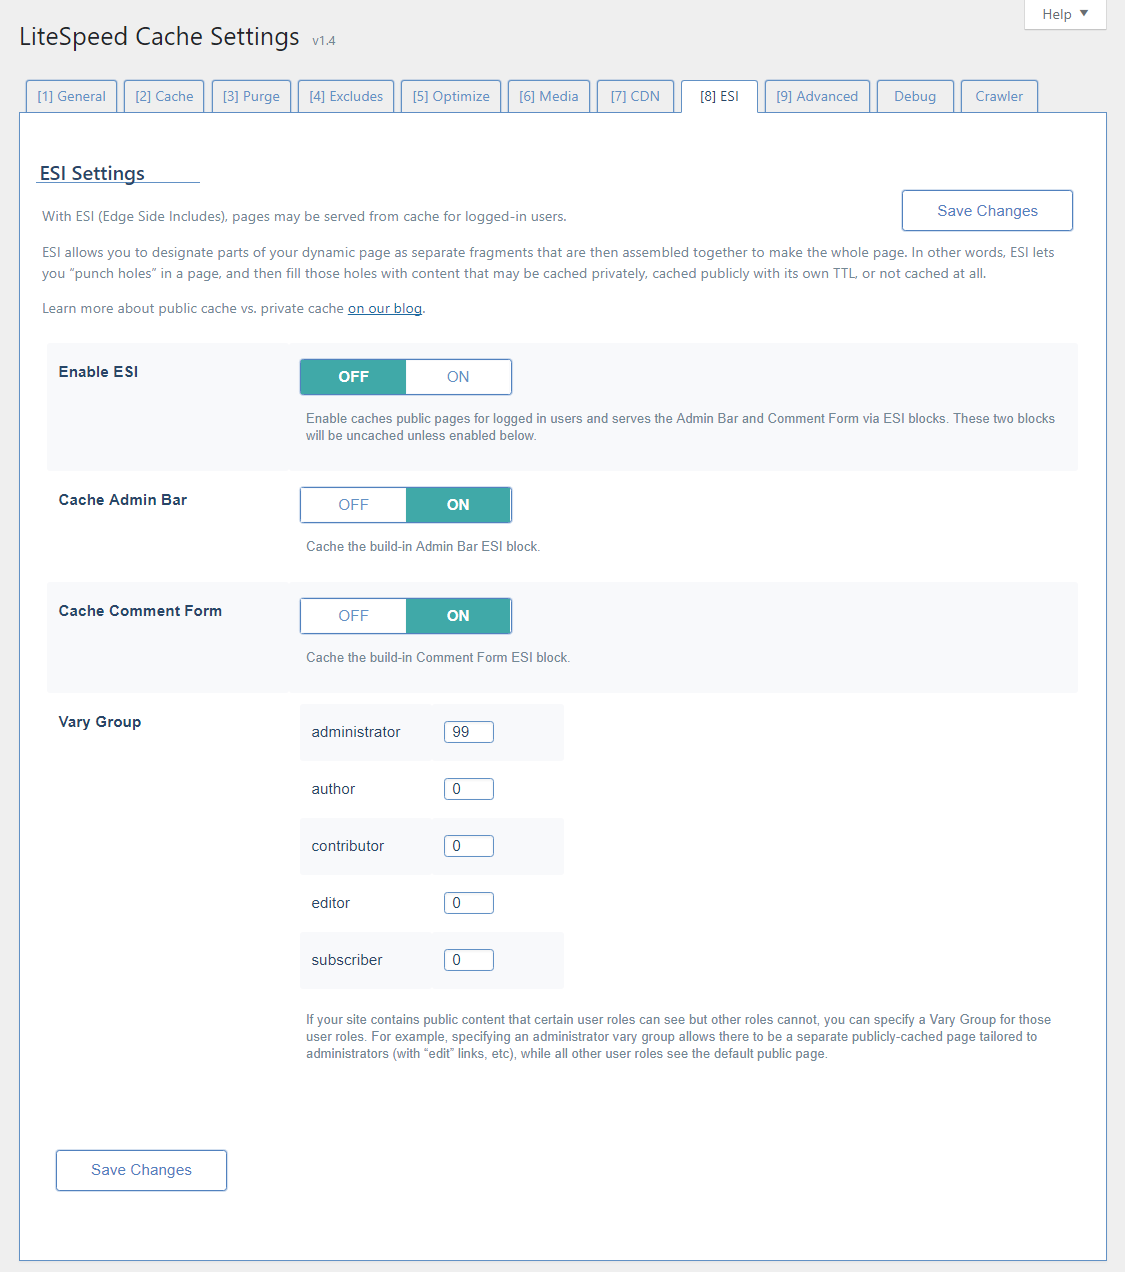
To turn on ESI, set Enable ESI to Enable.
This creates the following ESI blocks:
- Admin Bar
- Comments
- Comment form
- Recent Posts widget
- Recent Comments widget
The first three blocks will remain uncached, unless you enable them via the Cache Admin Bar and Cache Comment Form settings.
The widgets are controlled on a widget-by-widget basis from the Appearance > Widgets menu.
Vary Groups
With Vary Groups you can have multiple publicly-cached versions of a single page, based on the permissions of the users who view the page.
For example, in some themes administrator functions will appear right on the public pages (like an “edit” link at the end of a post). If you create a vary group for administrators, then LSCache will save two public copies of the page: one with all of the editing permissions displayed on it for anyone in the administrator group, and the default copy of the page without the editing links for everyone else.
Your list of user roles may vary from those in the image above. That's normal.
To create a vary group for any user role shown, enter a non-zero value into the box next to that user role. If a user role has a 0 next to it, then it will be served the default cached copy.
There is no significance to the numbers other than the fact that unique views should have unique numbers.
If two user roles share the same view, put them in the same group by giving them the same number.
Advanced
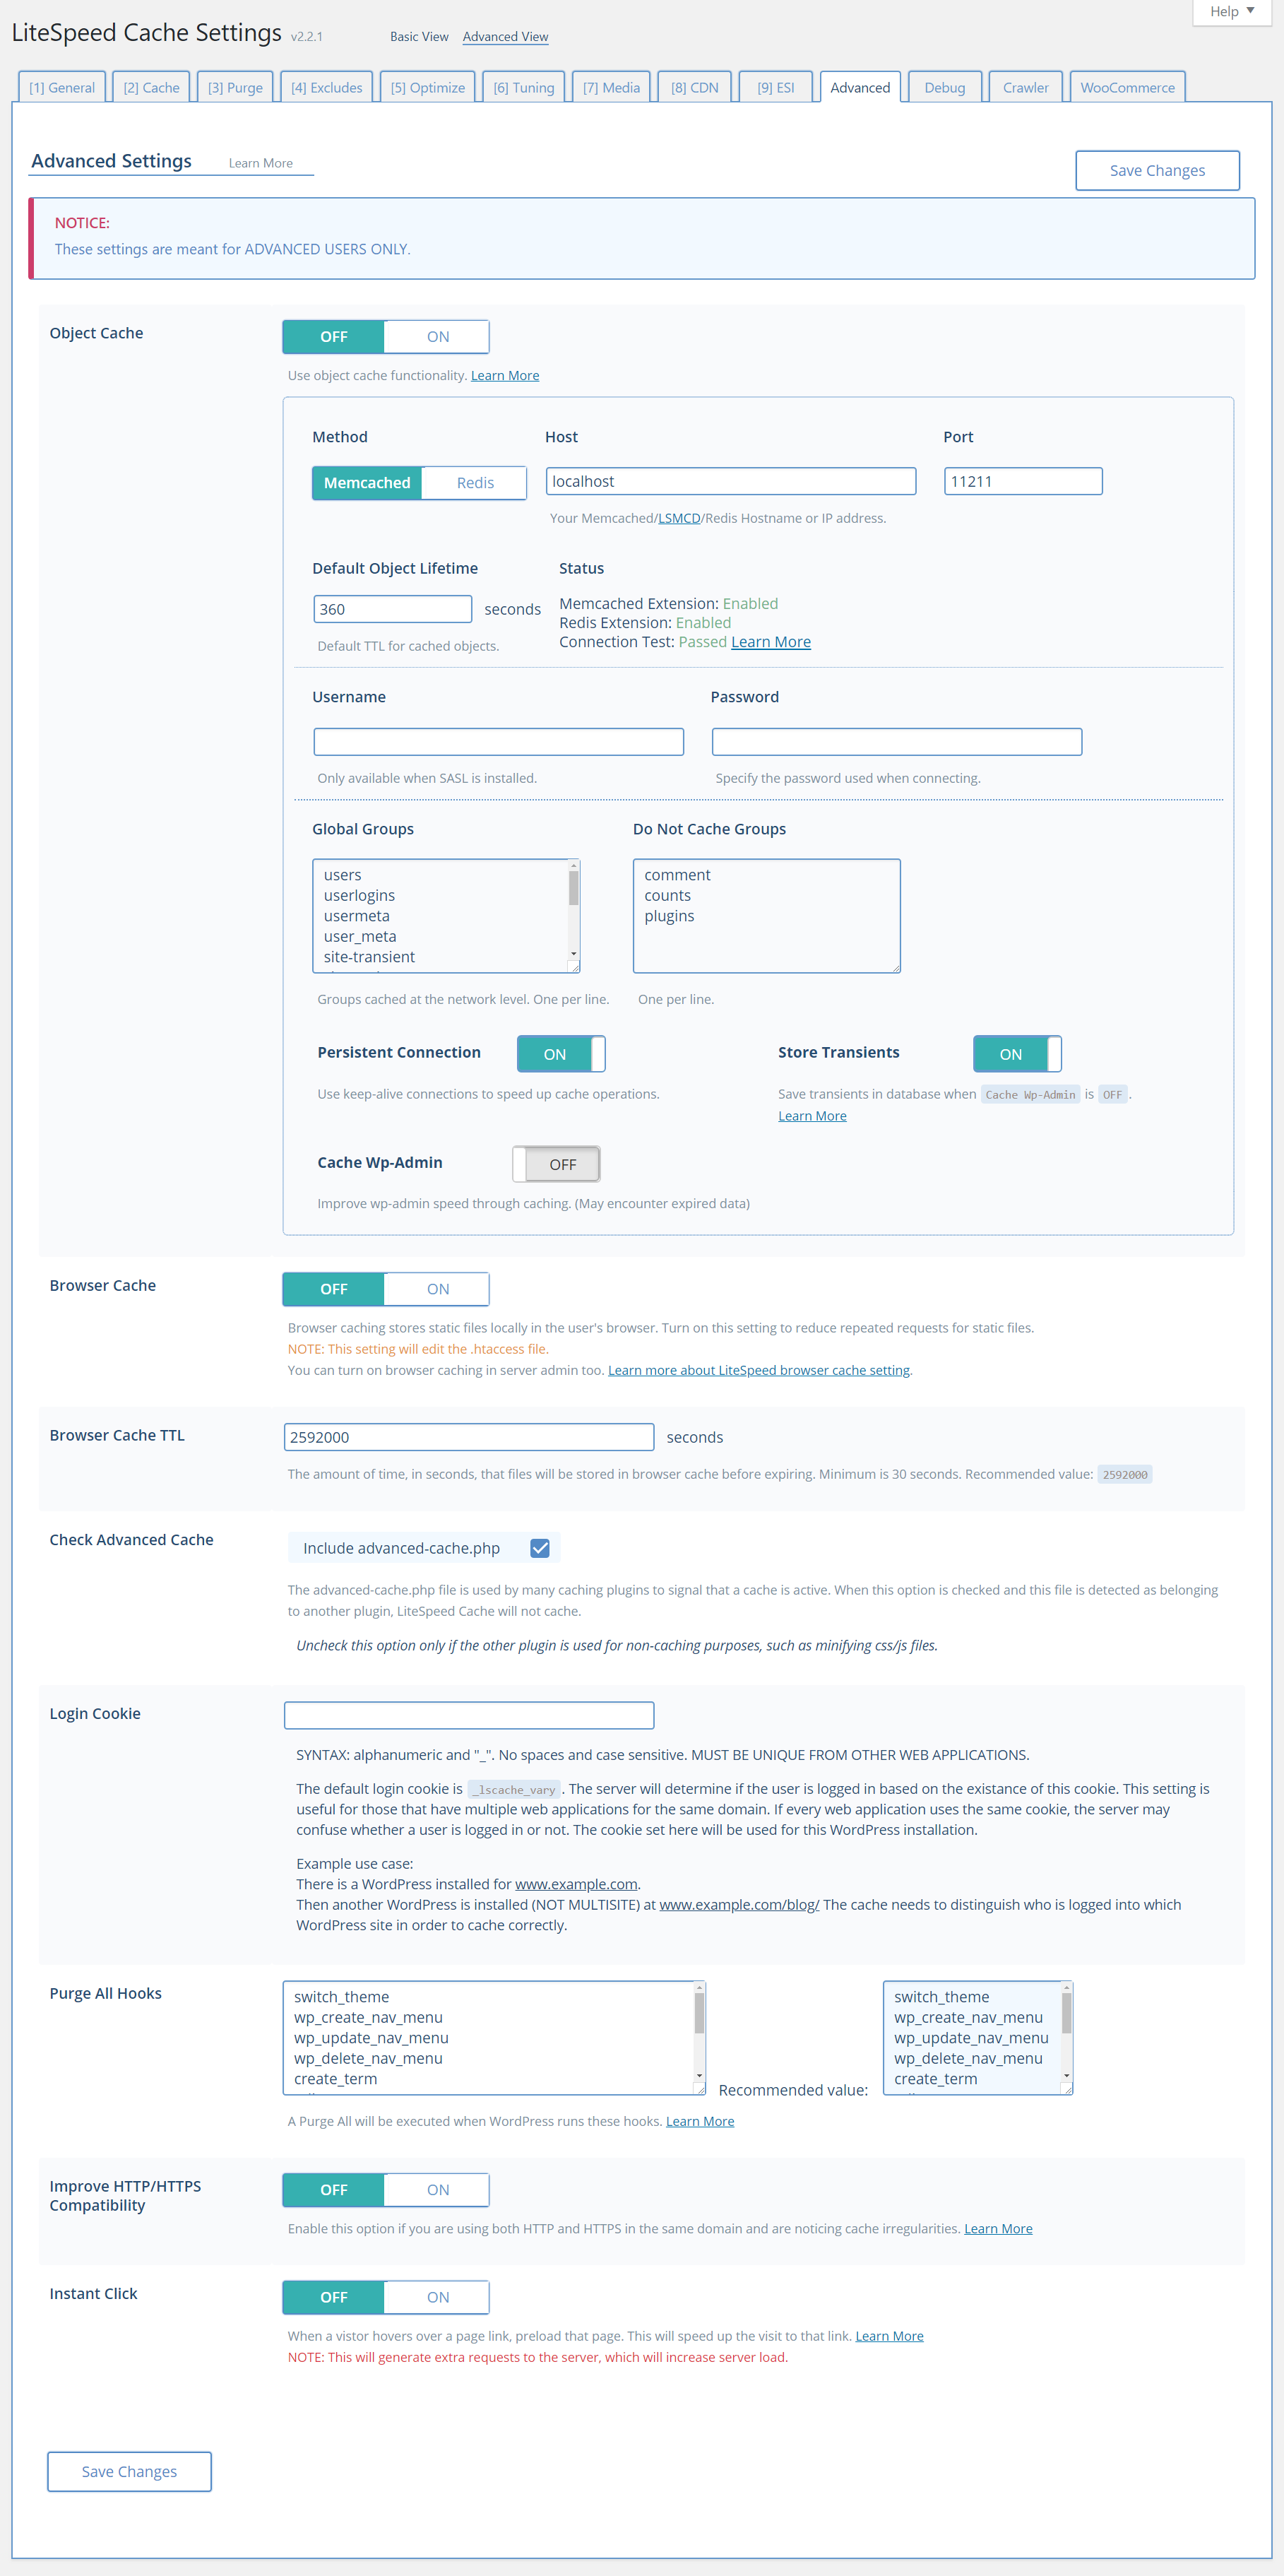
Check advanced-cache.php
checked
This option can be unchecked if another cache plugin is used for non full page caching purposes. For example, the other plugin can be a db cache, minification, etc.
Note: If another cache plugin is not being used, it is recommended to leave this on.
Login Cookie
empty string
This option should be used to configure a unique login cookie if multiple web applications with a LSCache plugin are used in a single virtual host.
An example login cookie is _wp_login_1
Debug
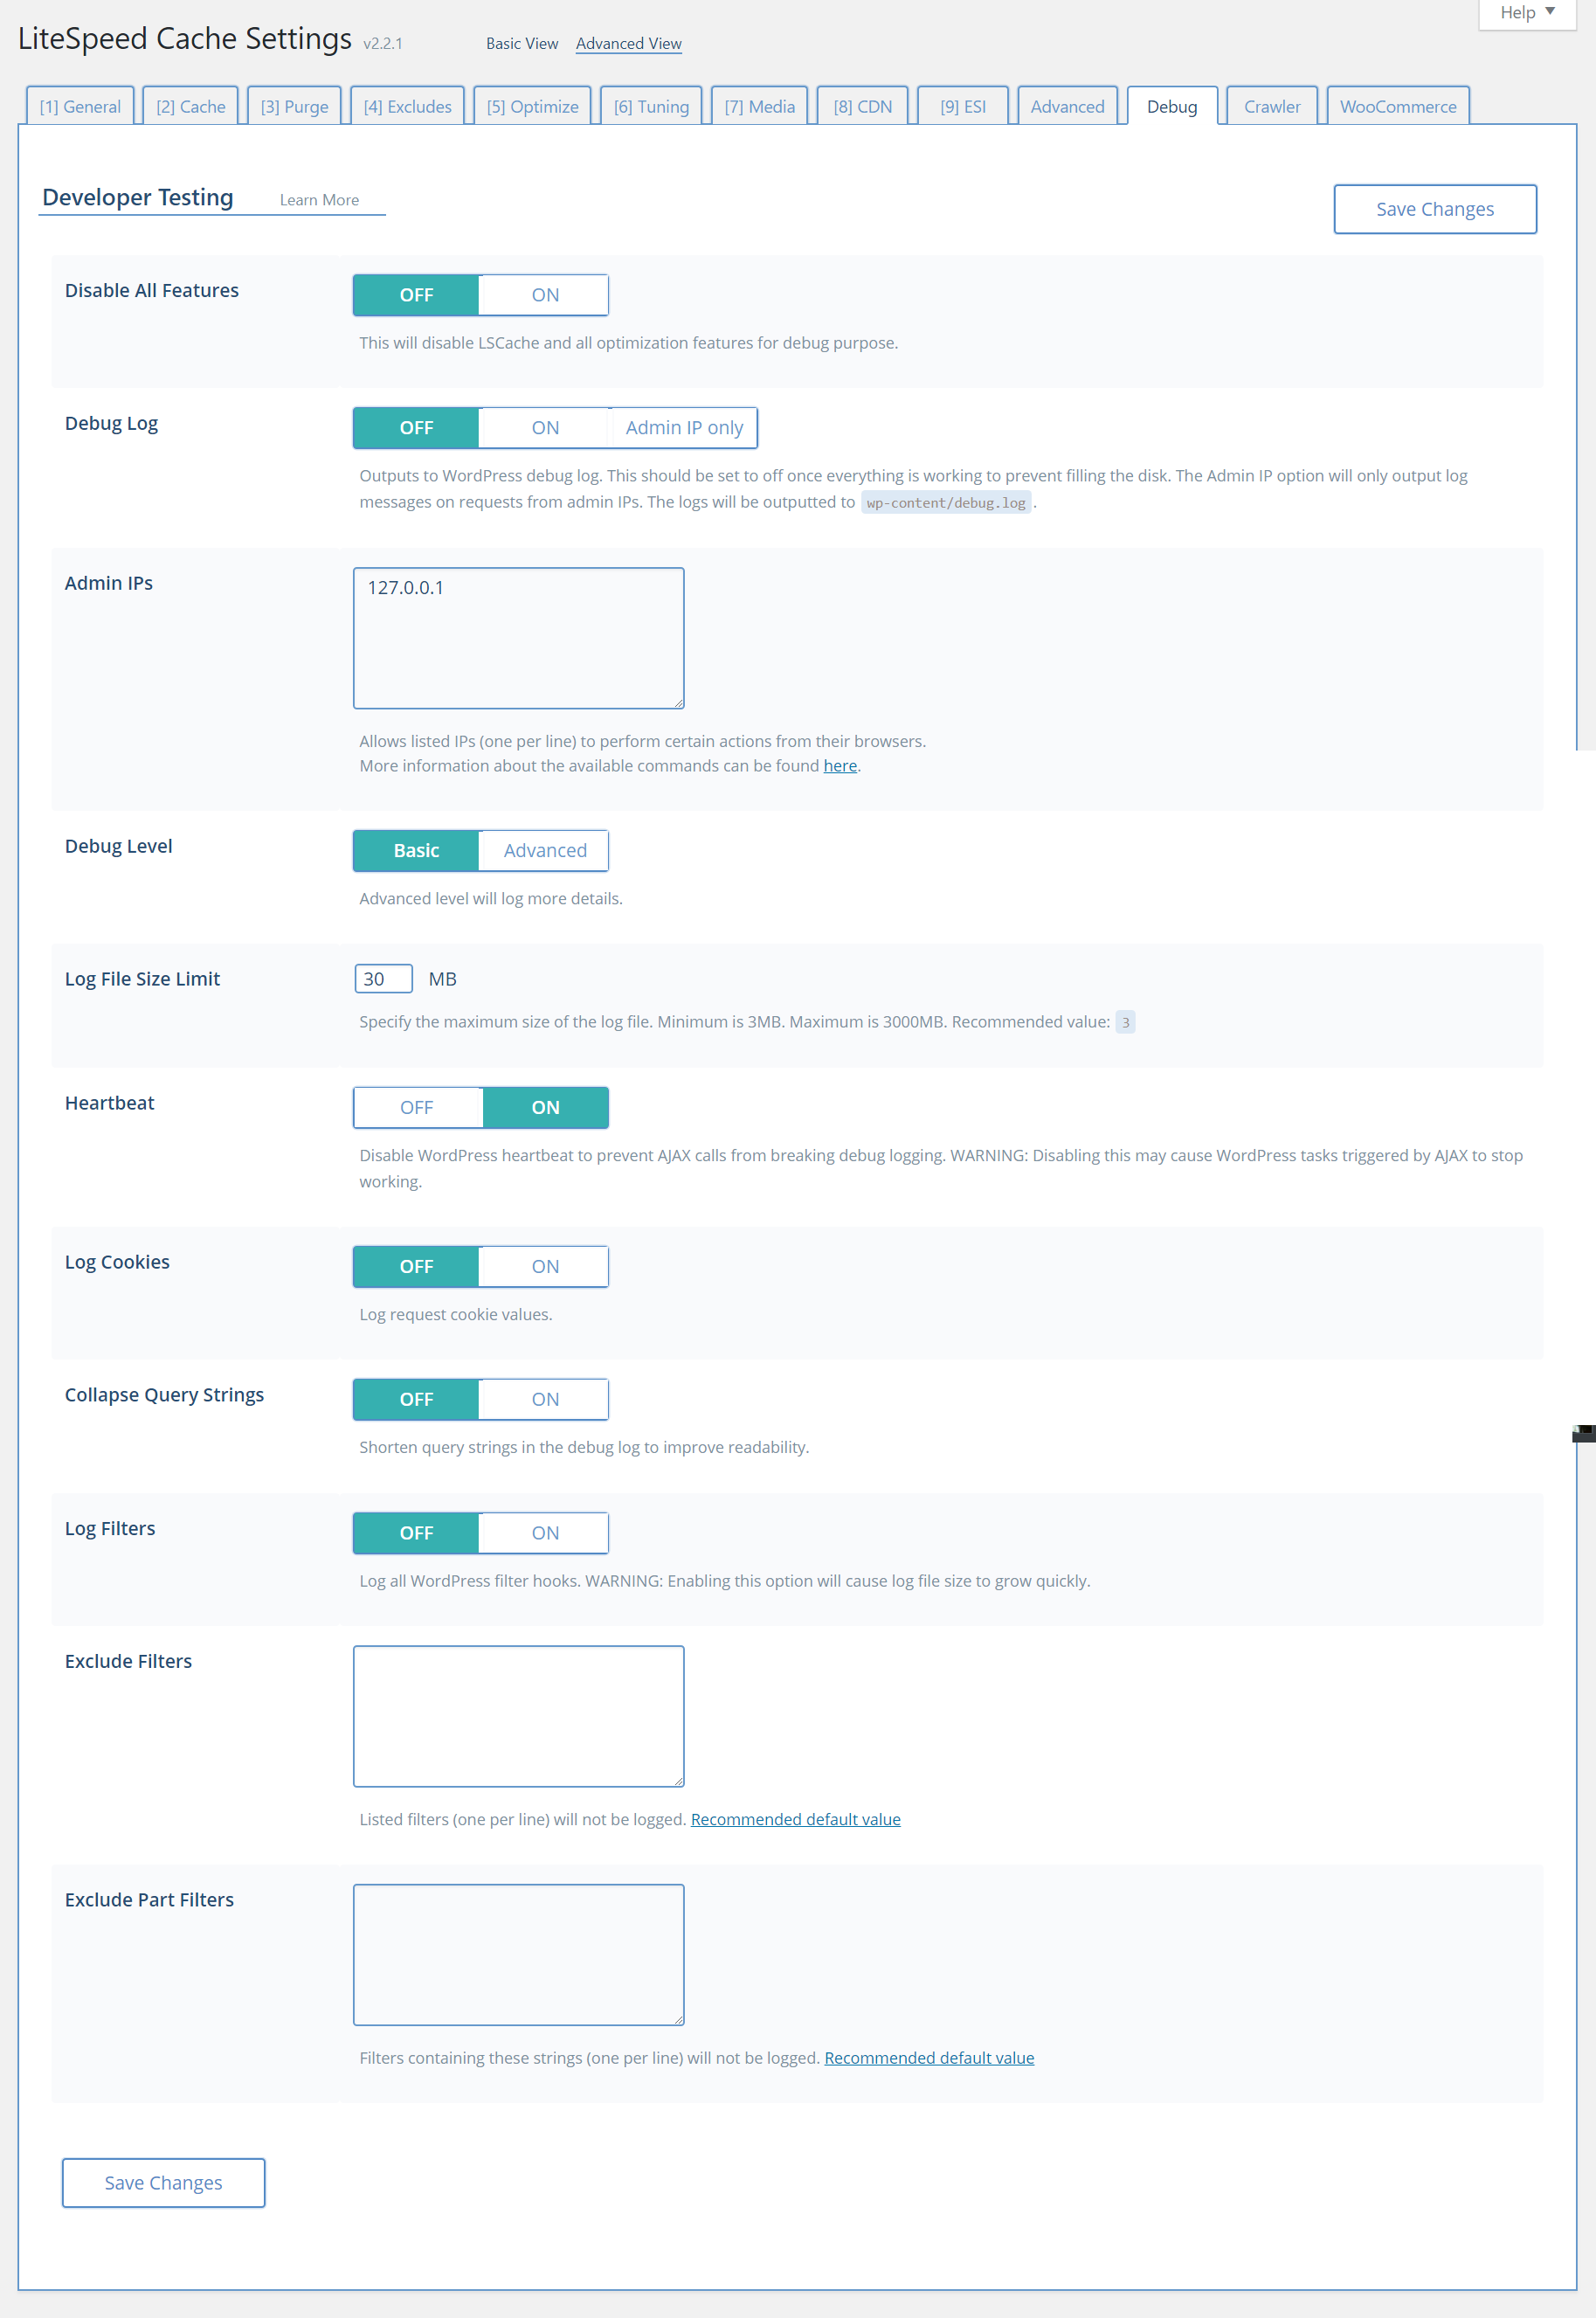
Debug Log
off/Admin IPs only/on
This enables/disables the debug log. The log will be written to wp-content/debug.log.
Admin IPs
127.0.0.1
This should be a comma delimited list of admin IPs. Admin IPs are used for debugging and admin purging purposes. When a request comes in with the admin IP, it is possible to purge front end pages using just a LSCWP_CTRL query string. More information can be found here.
Debug Level
Basic / Advanced
This setting determines how detailed of a log to keep.
Log File Size Limit
30 between 3 and 3000
Specify the maximum size of the log file. Minimum is 3MB. Maximum is 3000MB.
Heartbeat
Checked
If AJAX calls are breaking while logging, you can disable the WordPress heartbeat. Be aware that disabling this may cause WordPress tasks triggered by AJAX to stop working.
Log Cookies
Disabled Log request cookie values.
Collapse Query Strings
Disabled Shorten query strings in the debug log to improve readability.
Log Filters
Disable Log all WordPress filter hooks. Enabling this option will cause log file size to grow quickly, so only enable it if absolutely necessary.
Exclude Filters
gettext
gettext_with_context
get_the_terms
get_term
If you have enabled filter logging, you can specify a list of filters (one per line) that will not be logged.
Exclude Part Filters
i18n
locale
settings
option
Filters containing these strings (one per line) will not be logged.
Crawler
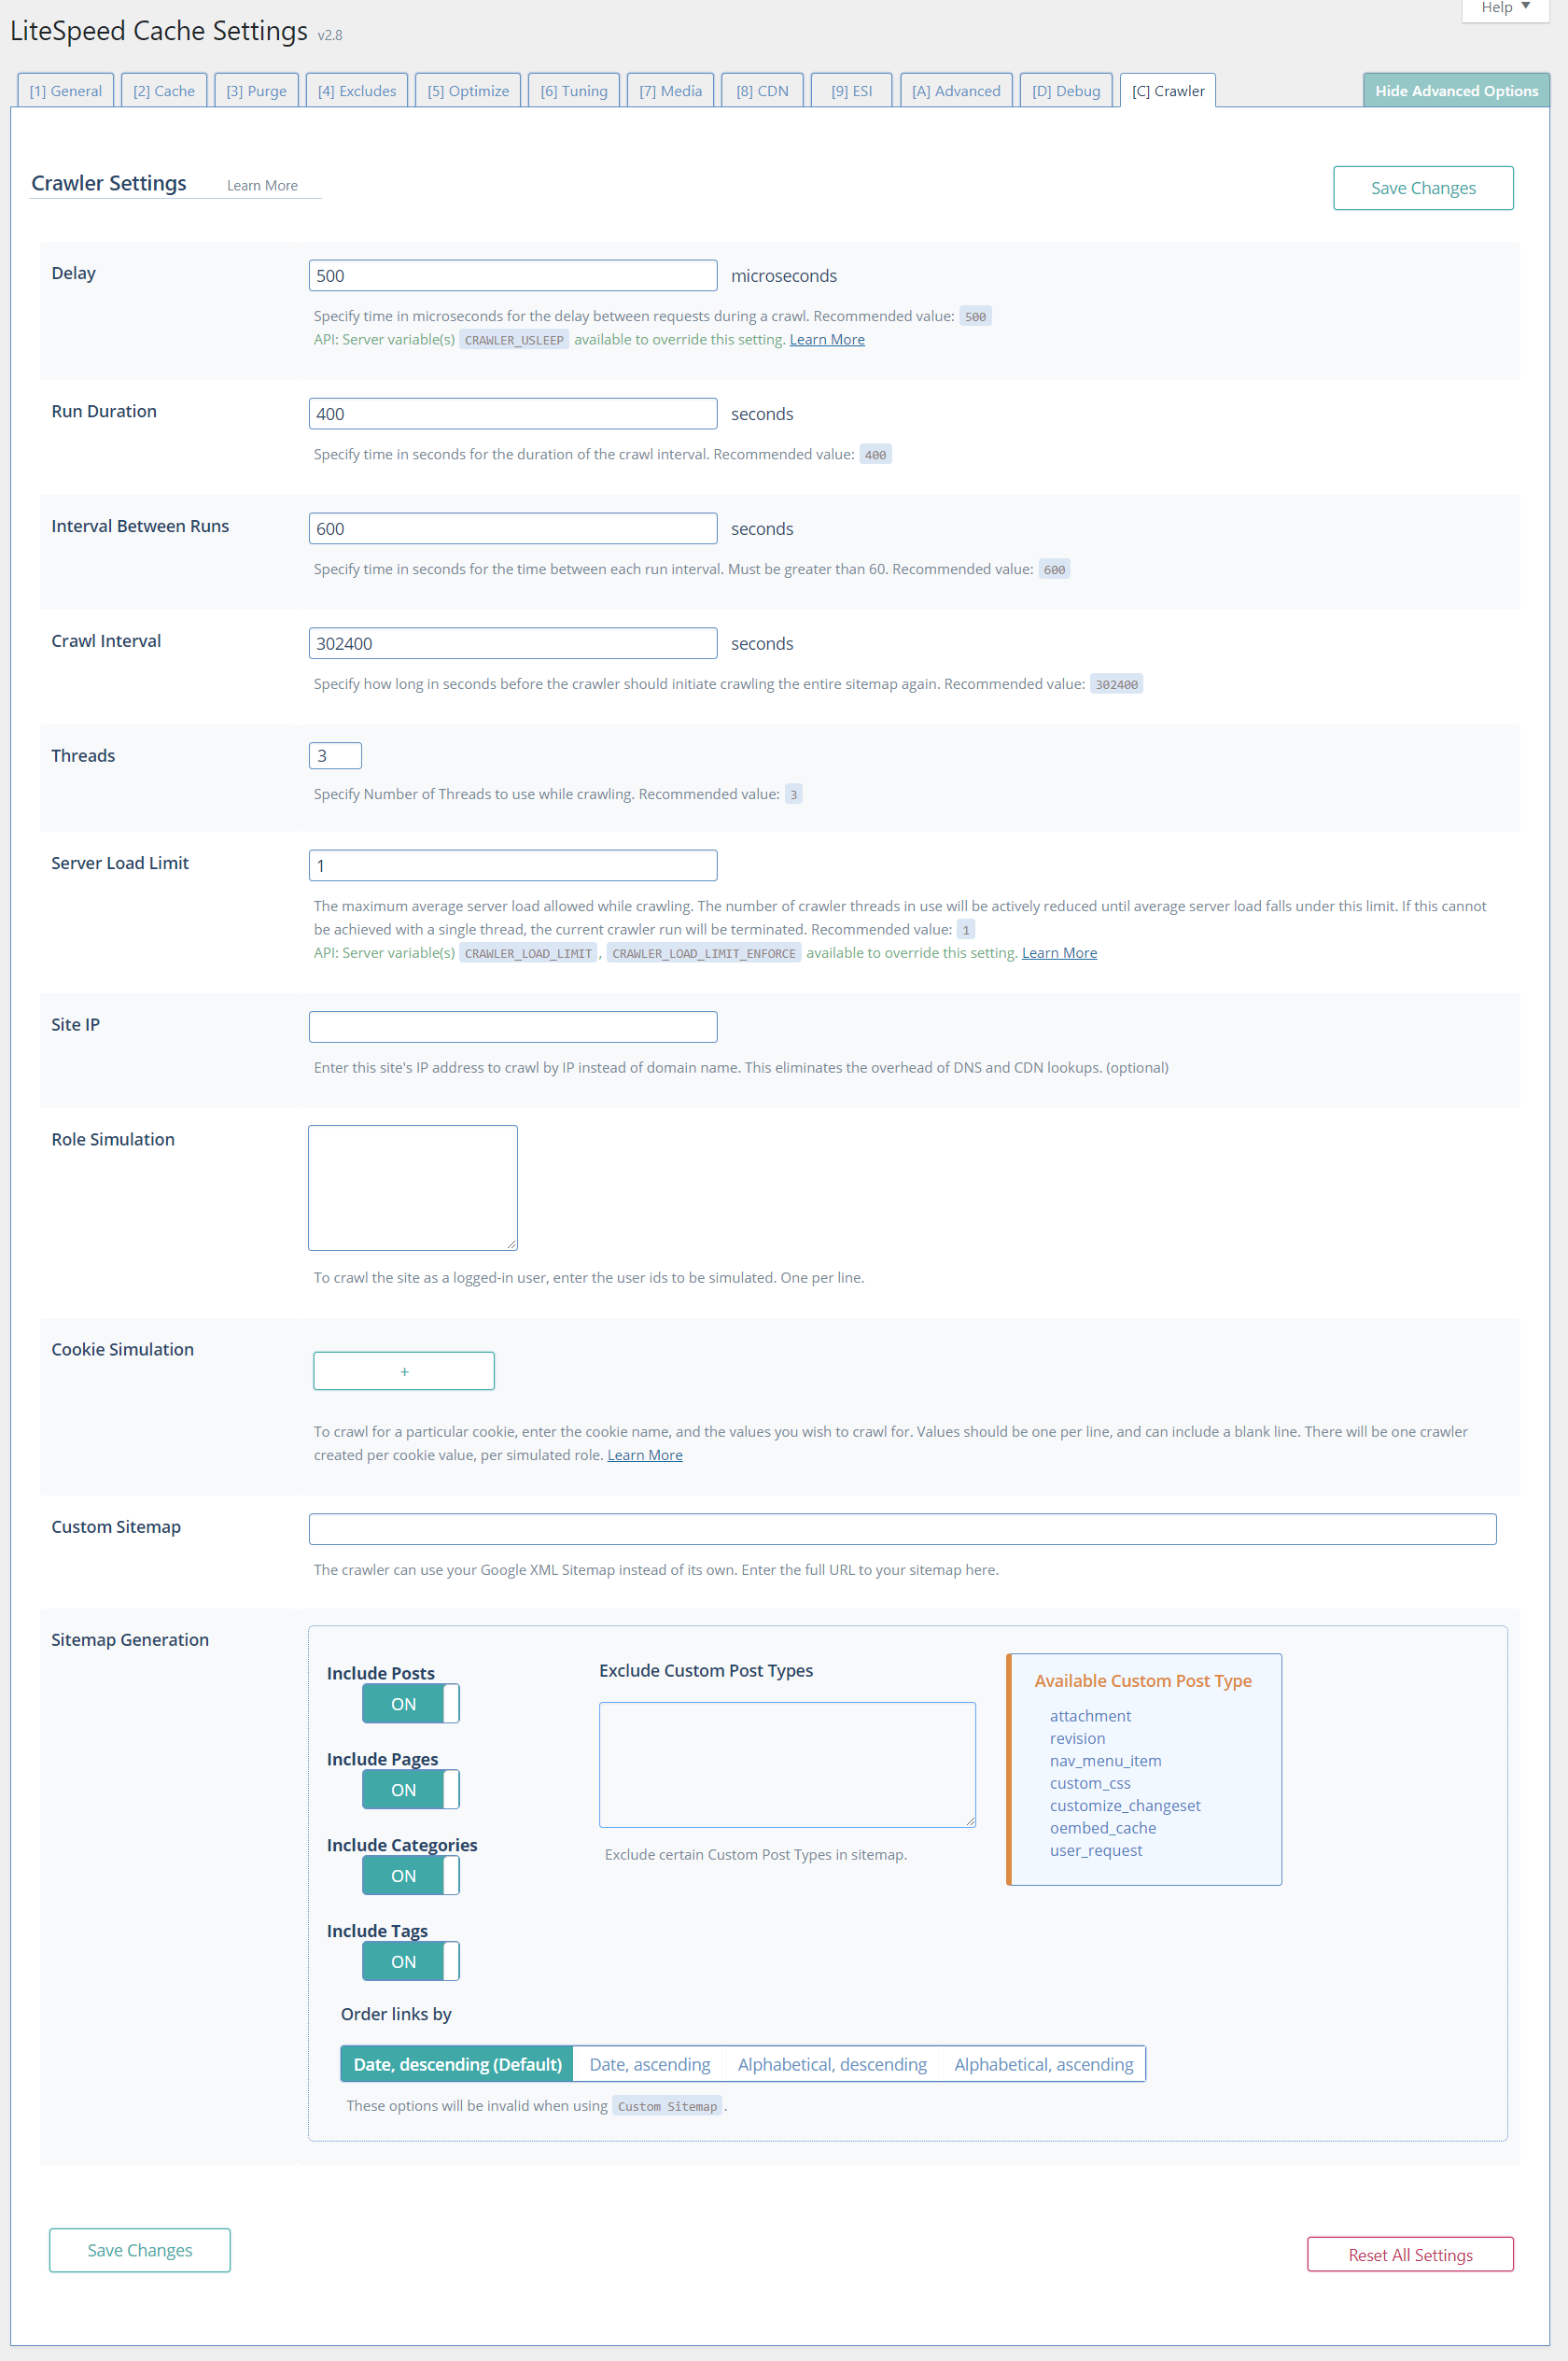
Delay
10000
Set the Delay to let LSCache know how often to send a new request to the server. You can increase this amount to lessen the load on the server, just be aware that will make the entire crawling process take longer.
Run Duration
200
This is how long the crawler runs before taking a break. The default of 200 has the crawler run for 200 seconds, then it temporarily stops. After the break is over, the crawler will start back up exactly where it left off and run for another 200 seconds. This will continue until the entire site has been crawled.
Interval Between Runs
28800
This setting determines the length of the break mentioned above. By default, the crawler rests for 28800 seconds in between every 200-second run.
Crawl Interval
604800
This value determines how long to wait before re-initiating the entire crawling process. To keep your site regularly-crawled, determine how long the crawler usually takes to run, and set this value to slightly longer than that.
Threads
3
This is the number of separate crawling processes happening concurrently. The higher the number, the faster your site is crawled, but also the more load that is put on your server.
Server Load Limit
1
This setting is a way to keep the crawler from monopolizing system resources. Once it reaches this limit, the crawler will be terminated rather than allowing it to compromise server performance. This setting is based on linux server load. (A completely idle computer has a load average of 0. Each running process either using or waiting for CPU resources adds 1 to the load average.)
Site IP
Empty string
As of v1.1.1, you can enter your Site’s IP address to simplify the crawling process and eliminate the overhead involved in DNS and Content Delivery Network (CDN) lookups. To understand why, let’s look at a few scenarios.
This is how it works if you’re using a CDN:
- The crawler gets
http://yourserver.com/pathfrom the sitemap - The crawler checks with the DNS to find
yourserver.com’s IP address - The DNS returns the CDNs IP address to the crawler
- The crawler goes to the CDN to ask for the page
- The CDN grabs the page from
yourserver.com - The CDN returns the page to the crawler
This is how it works if you’re not using a CDN:
- The crawler gets
http://yourserver.com/pathfrom the sitemap - The crawler checks with the DNS to find
yourserver.com’s IP address - The crawler grabs the page from
yourserver.com
In both scenarios, there are lookups that occur, expending time and resources. These lookups can be eliminated by entering your site’s IP in this field.
When the crawler knows your IP, this is how it works:
- The crawler gets
http://yourserver.com/pathfrom the sitemap - The crawler grabs the page directly from
yourserver.combecause it already knows the IP address
The middlemen are eliminated, along with all of their overhead.
Custom SiteMap
Empty string
A sitemap tells the crawler which pages on your site should be crawled. By default, LSCache for WordPress generates its own sitemap. If, however, you already have a sitemap that you’d like to use, that is an option as of v1.1.1.
Enter the full URL to the sitemap in this field.
Note: the sitemap must be in Google XML Sitemap format.
Include Posts / Include Pages / Include Categories / Include Tags
Enabled
These four settings determine which taxonomies will be crawled. By default, all of them are.
Exclude Custom Post Types
Empty string
By default all custom taxonomies are crawled. If you have some that should not be crawled, list them in this field, one per line.
Order Links By
Date, descending
This field determines the order that the crawler will parse the sitemap. By default, priority is given to the newest content on your site. Set this value so that your most important content is crawled first, in the event the crawler is terminated before it completes the entire sitemap.