This is an old revision of the document!
Installing & Enabling The LSCache Plugin For WordPress
There are two ways to use LSCWP:
- Without a LiteSpeed server, and with limited functionality (optimization features only, no cache)
- With a LiteSpeed Web Server + LSCache license, and with full functionality (optimization and cache features)
LSCWP Without LiteSpeed Web Server
- Simply install and activate the plugin through the WordPress Admin interface.
- Navigate to LiteSpeed Cache > Settings and click
Advanced Viewto see all the tabs. - Have fun playing with the options! Tab-by-tab instructions are here, if you need them.
LSCWP With LiteSpeed Web Server
Pre-Installation Requirements
- LiteSpeed Web Server Enterprise Edition 5.0.10+.
- LSCache Module. (Included with a 2-CPU or higher license. Can be purchased as an add-on for VPS, Ultra VPS, and 1-CPU licenses.)
Installation
- Configure server-level and/or virtual-host-level cache root and cache policy by selecting your setup in the Web Server Configuration section of the LiteSpeed Web Cache Common Installation Guide.
- Disable any other page caches as these will interfere with LSCWP.*
- Download the LSCWP plugin from our WordPress Plugin Directory page.
- Log in to your WordPress Dashboard, navigate to Plugins > Add New and click on Upload Plugin.
- Select the LSCWP zip file and click Install Now. Activate the plugin.
- Navigate to LiteSpeed Cache > Settings > General and set Enable LiteSpeed Cache to
Enable.
You may also install the plugin directly from the Plugins > Add New screen. Replace steps 3-5 above with:
- Search for
LiteSpeed Cachein the search box. Our plugin should be the first search result to come up. - Press Install Now. Activate the plugin.
* Please see this wiki article for assistance using multiple optimization plugins at once.
Testing
You can verify a page is being served from LSCWP through the following steps:
- Open the developer tools on a non-logged-in browser and navigate to your site. Open the Network tab.
- Refresh the page.
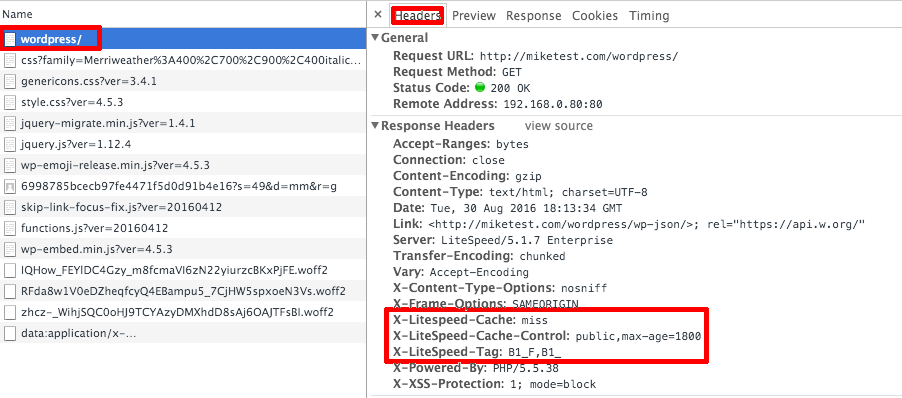
- Click the first resource (this should be an HTML file and the resource's headers should appear as in the image below). For example, if your page is
http://example.com/wordpress/, your first resource should either be something likeexample.com/wordpress/orwordpress/.
- In a different, logged-in browser, in your WordPress Dashboard, navigate to LiteSpeed Cache > Manage and click the Purge All button.
- Reload the page in the first (non-logged-in) browser and select the same resource again. If you see headings similar to
X-LiteSpeed-Cache: miss
X-LiteSpeed-Cache-Control:public,max-age=1800
X-LiteSpeed-Tag:B1_F,B1_
(for example), this means the page had not yet been cached, but that LiteSpeed has now stored it for future use.
- Reload the page a second time and you should see
X-LiteSpeed-Cache: hitin the response header. This means the page is being served by the cache and LSCWP is configured correctly.
Note: If your first refresh after purging returns X-LiteSpeed-Cache: hit in the response header, this may be because someone else visited the page after you purged but before you refreshed it yourself. Try again from step 4.
Good to Know
Here are a few other things that may may be useful for your installation.
Turning On the WordPress Debug Log
To enable the WordPress debug log, modify wp-config.php under WordPress' root directory as follows:
- Set
WP_DEBUGto true.
define('WP_DEBUG',true); - Add the following:
define('WP_DEBUG_LOG',true);
A debug.log file will be generated under the wp-content directory, and will log information whenever WordPress hits the backend.
You can monitor this log during debugging using the following command:
tail -f wp-content/debug.log
Multiple LiteSpeed Cache Plugins
If you are using any of our other LiteSpeed Cache plugins for other web apps (like Magento, PrestaShop, XenForo, etc), or you are running multiple instances of WordPress, please see this article for some important information about avoiding conflicts between the different apps' caches.
WordPress Lacks Permissions
If WordPress doesn't have access to create tables in your database, please run these SQL queries manually after installation:
CREATE TABLE IF NOT EXISTS wp_litespeed_optimizer (
id INT(11) NOT NULL AUTO_INCREMENT,
hash_name VARCHAR(60) NOT NULL COMMENT “hash.filetype”,
src text NOT NULL COMMENT “FULL url array SET”,
dateline INT(11) NOT NULL,
refer VARCHAR(255) NOT NULL COMMENT “The container page url”,
PRIMARY KEY (id),
UNIQUE KEY hash_name (hash_name),
KEY dateline (dateline)
);
and
CREATE TABLE IF NOT EXISTS `wp_litespeed_img_optm` (
  `id` INT(11) UNSIGNED NOT NULL AUTO_INCREMENT,
  `post_id` BIGINT(20) UNSIGNED NOT NULL DEFAULT '0',
  `optm_status` VARCHAR(64) NOT NULL DEFAULT '',
  `src` VARCHAR(1000) NOT NULL DEFAULT '',
  `srcpath_md5` VARCHAR(128) NOT NULL DEFAULT '',
  `src_md5` VARCHAR(128) NOT NULL DEFAULT '',
  `server` VARCHAR(255) NOT NULL DEFAULT '',
  `root_id` INT(11) NOT NULL DEFAULT '0',
  `src_filesize` INT(11) NOT NULL DEFAULT '0',
  `target_filesize` INT(11) NOT NULL DEFAULT '0',
  `target_saved` INT(11) NOT NULL DEFAULT '0',
  `webp_filesize` INT(11) NOT NULL DEFAULT '0',
  `webp_saved` INT(11) NOT NULL DEFAULT '0',
  PRIMARY KEY (`id`),
  UNIQUE KEY `post_id_2` (`post_id`,`srcpath_md5`),
  KEY `post_id` (`post_id`),
  KEY `optm_status` (`optm_status`),
  KEY `root_id` (`root_id`),
  KEY `src_md5` (`src_md5`),
  KEY `srcpath_md5` (`srcpath_md5`)
  );
Note: If your site uses a table prefix other than wp_, please replace the wp_ in wp_litespeed_optimizer with your site's prefix.