This is an old revision of the document!
WHM Plugin - LiteSpeed Cache For WordPress Management
The LiteSpeed WHM plugin contains a section for managing LiteSpeed Cache for WordPress. This wiki entry will guide you through the different operations and management actions you can take when using our plugin.
If you do not see the LiteSpeed Cache For WordPress Management section on your LiteSpeed WHM plugin screen, please upgrade LiteSpeed Web Server to 5.1.x at the minimum.
You must have a license with LSCache enabled to use these features. How To Get LSCache
Getting Started
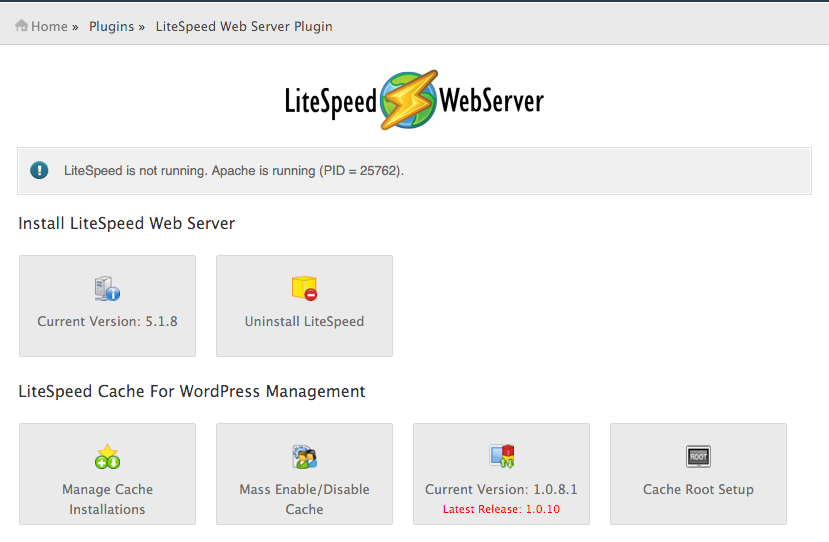
From the initial plugin screen you should be presented with 4 different options under the LiteSpeed Cache For WordPress Management section.
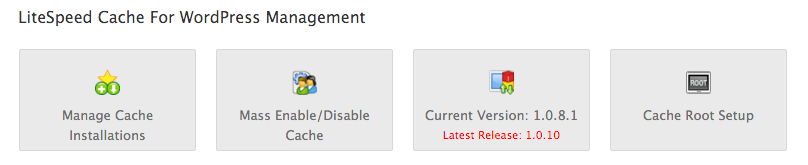
- The fourth option, Cache Root Setup is a one-time action, and is actually the first thing you need to do before you can try any of the other options. Once the cache root has been set up for the first time, there will be no need to do it again, and you will be free to use the other options at will.
- Manage Cache Installations allows you to manage LiteSpeed Cache for WordPress on your individual WordPress installations.
- Mass Enable Cache & Mass Disable Cache can be used to enable/disable LiteSpeed Cache for WordPress on all discovered WordPress installations which are not flagged (more on flags later).
- Version Manager displays the currently active LSCache for WordPress version (more on the Active Version later). It also allows you to adjust this active LSCache for WordPress version and to upgrade and downgrade LSCache for WordPress installations based on their current version.
Cache Root Setup
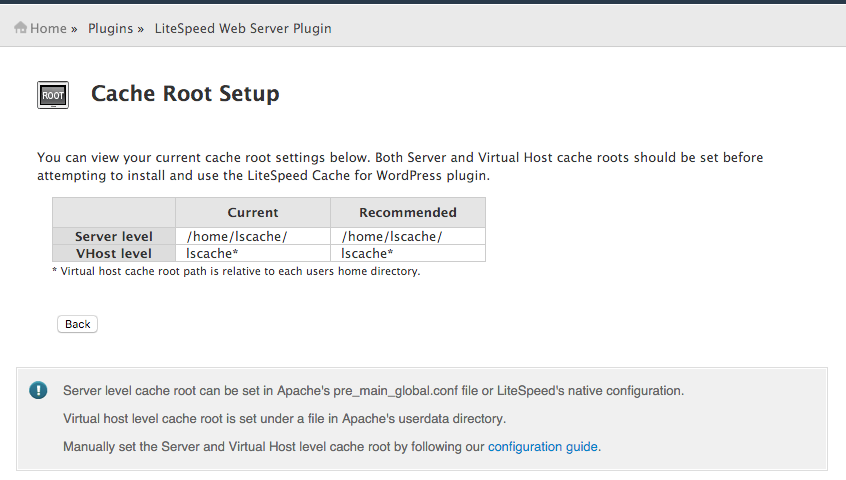
This screen searches for Server level cache root definitions in either the /usr/local/apache/conf/includes/pre_main_global.conf file or in the LiteSpeed Web Server Web Admin under Server > Cache > Cache Storage Settings > Storage Path setting.
If it is defined in pre_main_global.conf it should look something like this:
<IfModule LiteSpeed>
CacheRoot /home/lscache/
</IfModule>
Where /home/lscache/ is the CacheRoot path. In this case, the Server level cache root will be set to /home/lscache/
This screen searches for VHost level cache root definitions in the /usr/local/apache/conf/userdata/lscache_vhosts.conf file.
If it is defined in lscache_vhosts.conf it should look something like this:
<IfModule LiteSpeed>
CacheRoot lscache
</IfModule>
Where lscache is the CacheRoot path. In this case, the VHost level cache root will be set to /home/<user_folder>/lscache
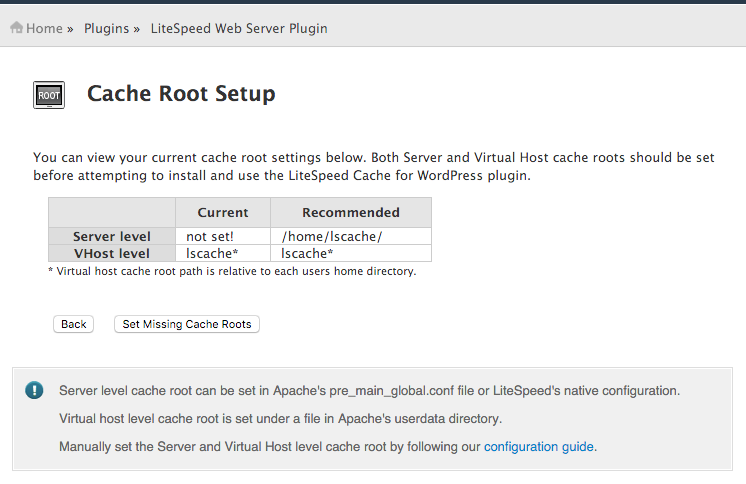
Set Missing Cache Roots - Sets Server level and VHost level Cache Root definitions if they are detected as not set.
Note: The Set Missing Cache Roots button will only appear if at least one of the two cache roots (Sever level and VHost level) is detected as not set.
Manage Cache Installations
The manage view is where most of the magic happens. Here you can manage LiteSpeed Cache for WordPress for your WordPress installations individually or in small groups. (There is nothing wrong with big groups, but that is what Mass Enable Cache and Mass Disable Cache are for)
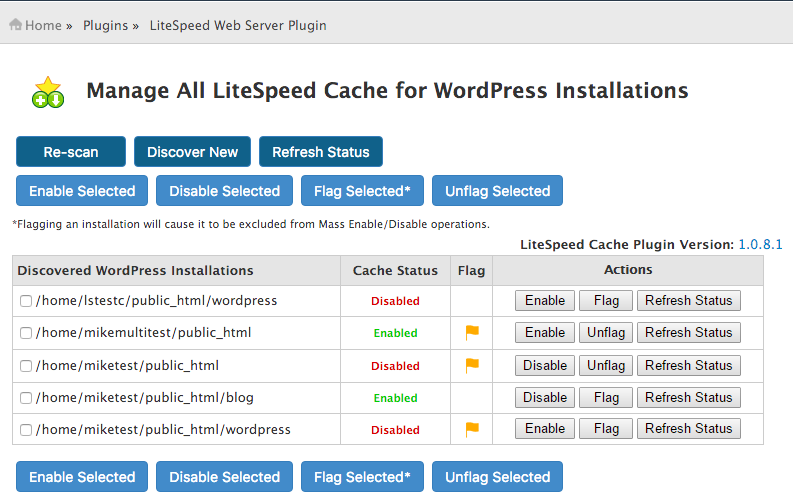
Starting from the actual table we have the following fields:
- Discovered WordPress Installations - This field will contain the path of each WordPress installation discovered during the last scan operation.
- Cache Status - Displays the last known status of LiteSpeed Cache for WordPress for the listed WordPress installation.
- Flag - This field can either be blank or display a flag icon. While an installation is flagged, displaying the flag icon, it will be excluded from all future Mass Enable/Disable operations.
- Actions - This field contains action buttons that perform a specific action only for the related WordPress installation. These actions include Enable/Disable LiteSpeed Cache for WordPress, Flag/Unflag this installation, and Refresh Status which updates the current status of LiteSpeed Cache for WordPress for this installation only.
Looking at the top row of buttons, we have Scan/Re-scan, Discover New, and Refresh Status.
- Scan/Re-scan - Discovers all WordPress installations under each cPanel users
public_htmlfolder. These discovered installations will then be saved to a data file and displayed in the manager screen. If this data file is removed or corrupted, simply scan again to repopulate the list.
- Discover New - Discovers all WordPress installations belonging to users not already listed in the Discovered WordPress Installations section. This will NOT discover new WordPress installations for existing users. For these cases, Scan/ Rescan should be used instead.
- Refresh Status - Each listed WordPress installation will have a Cache Status of either “Enabled” or “Disabled” reflecting the status of LiteSpeed Cache for WordPress for that installation. The Refresh Status button will update this value to the most current status for all listed WordPress installations.
Moving on we have the the bottom row of buttons which are used to perform group operations. These buttons work in tandem with the check-boxes found next to each discovered installation to allow you to perform some basic operations for only the selected group.
- Enable Selected & Disable Selected - These buttons allow you to enable and disable LiteSpeed Cache for WordPress for the selected WordPress installations.
- Flag Selected & Unflag Selected - These buttons allow you to set or unset the flag field for the selected WordPress Installation. Flagged installations will be excluded from Mass Enable Cache and Mass Disable Cache operations.
- LiteSpeed Cache Plugin Version - This label shows the currently active version of the LSCache Plugin for WordPress. Clicking the version number listed here will take you to the Version Manager screen.
Mass Enable Cache & Mass Disable Cache
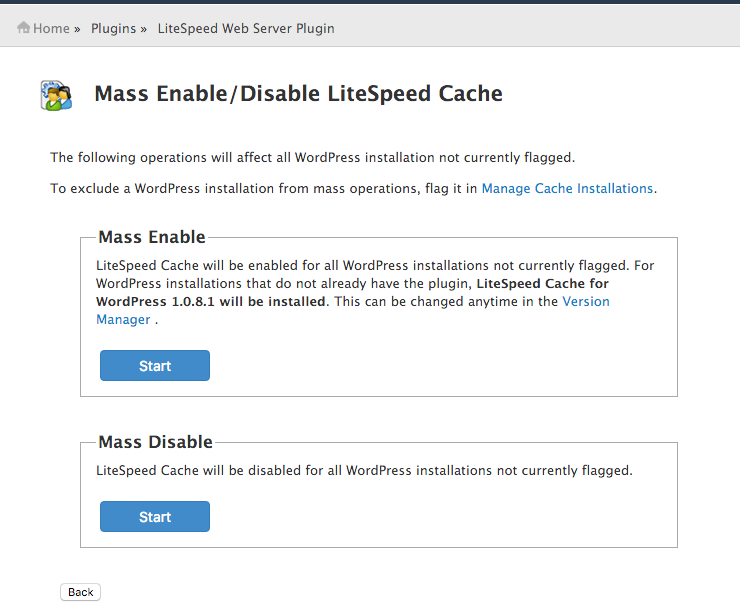
Both of these selections behave in a very similar way by allowing you to enable/disable LiteSpeed Cache for WordPress en masse.
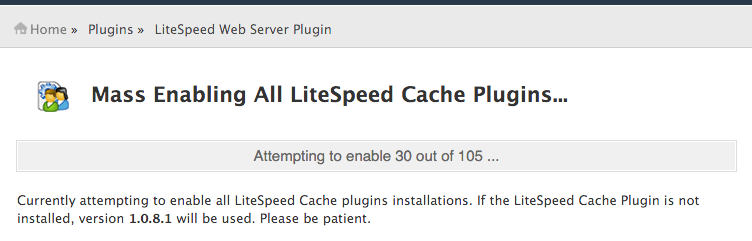
When Mass Enabling/Disabling LiteSpeed Cache for WordPress, all WordPress installations that are not currently flagged in the Manage screen will have LiteSpeed Cache for WordPress installed/removed. If a WordPress installation is detected as manually disabled, the WHM plugin will flag it and skip it. During this operation, you should see the following output screen.
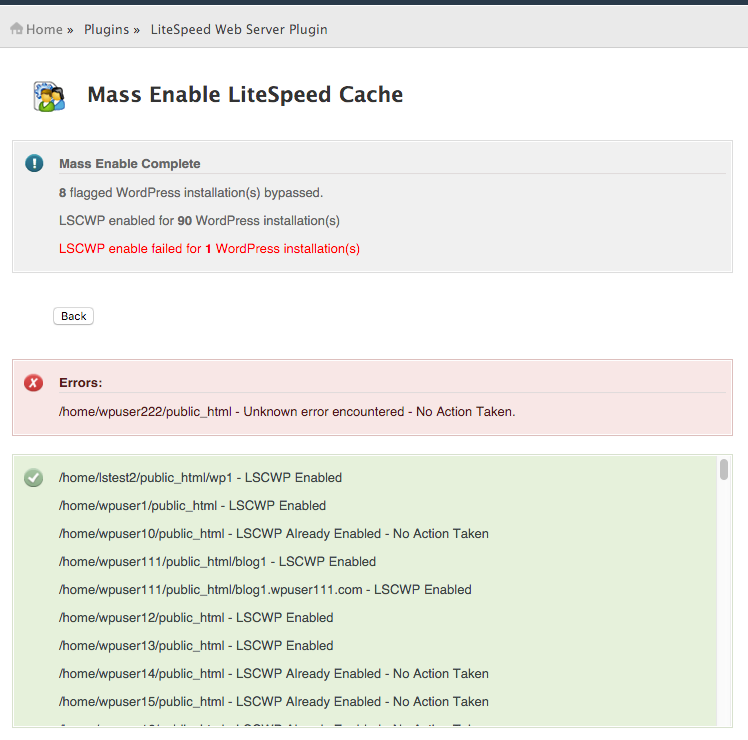
After this operation is complete you will get a short summary message letting you know how many installations had LiteSpeed Cache for WordPress enabled/disabled successfully and how many failed, as well as how many flagged installations were detected and skipped over. You will also be provided with both an error log and a success log shown under these results listing the installations that were enabled and those that failed along with the related error messages.
Note: If you have not performed a scan before clicking on Mass Enable/Disable Cache buttons, or your previous scan data is unable to be read by the plugin, you will be asked to scan again.
Version Manager
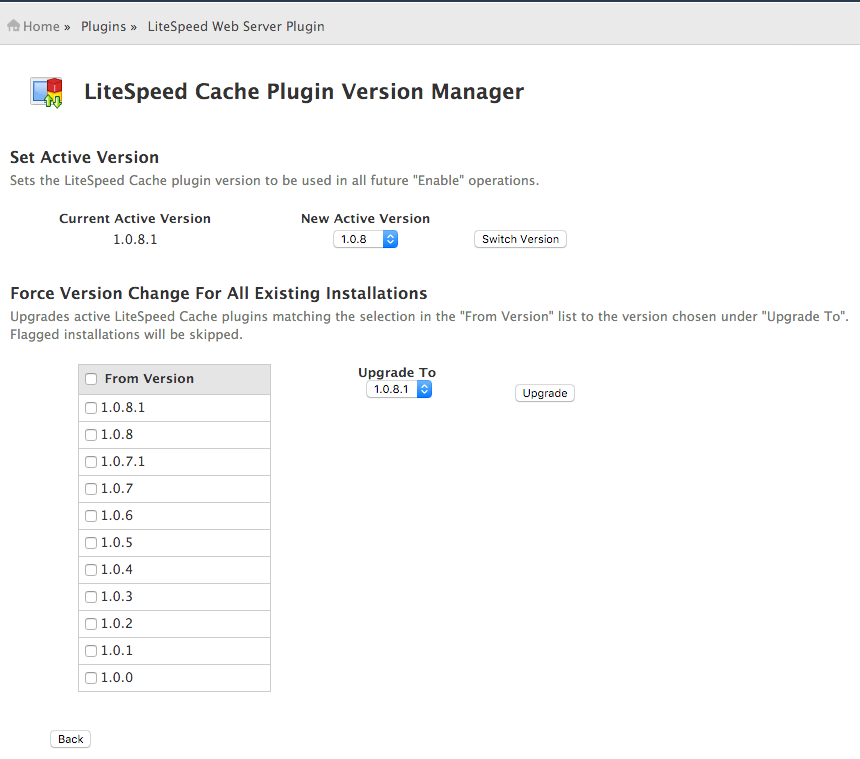
- Set Active Version - Allows you to change the Active Version of the LiteSpeed Cache for WordPress plugin. The Active Version is the LSCache for WordPress version that is used when the WHM plugin enables or mass enables caching for WordPress installations.
- Force Version Change For All Existing Installations - Allows you to change the version of existing LiteSpeed Cache for WordPress installations, allowing you to select which to change based on current cache version.
Command-Line Interface
As of LiteSpeed Enterprise 5.1.14, in addition to the plugin features above, a command-line interface script also exists under /usr/local/lsws/admin/misc/lscmctl for executing basic cache management actions through the terminal or in a cron job. The help page for this script is included below.
Learn more about the CLI script on our blog.
LiteSpeed Cache Manager Script Help Page

This script requires that you have cPanel with LiteSpeed Web Server Plugin installed.

Usage: ./lscmctl [-php path/to/php] command [flag/parameter]


Possible Commands:

scan [-n] [-e]
        Scan for all WordPress installations. This command will create an lsc_manager_data file under the '.../lsws/admin/lscdata' directory. Add the -n flag to only discover new installations. By adding the -e flag, LSC-WP will be enabled on all installations after scanning is complete.

setversion [--list] | [$VERSION]
        List/Set active LSCWP version. This command will list the currently active version when no additional input it given. Use --list to show available versions. Provide a valid version number to switch to that version.

enable -m | $WP_PATH
        Enables LSWCP for all discovered WordPress installations with the -m parameter or a single installtion by providing the path to the WordPress installation directory.

disable -m | $WP_PATH
        Disables LSWCP for all discovered WordPress installations with the -m parameter or a single installtion by providing the path to the WordPress installation directory.

upgrade -m | $WP_PATH
        Upgrade LSWCP for all discovered WordPress installations to the current active version with the -m parameter or a single installtion by providing the path to the WordPress installation directory.

flag $WP_PATH
        Flag a single WordPress installation. Flagged installations will be skipped during mass operations.

unflag $WP_PATH
        Unflag a single WordPress installation. Flagged installations will be skipped during mass operations.

status $WP_PATH
        Get the most up to date LSCWP status for the provided WordPress installation.


Example Usage:

Discover all installations:
./lscmctl scan

Discover new installations only, passing in path to php binary:
./lscmctl -php /path/to/php/ scan -n

Display currently active LSCWP version:
./lscmctl setversion

Set new active LSCWP version:
./lscmctl setversion 1.5

Enable LSCWP on all discovered installations:
./lscmctl enable -m

Disable LSCWP for a single installation:
./lscmctl disable /home/user/public_html/wp

Get LSCWP status for a single installation:
./lscmctl status /home/user/public_html/wp
Testing
Test your domains, you should see “X-LiteSpeed-Cache: hit” in the response header. Check here for detailed verification steps.
If “X-LiteSpeed-Cache: hit” can not be seen, you may need to do more troubleshooting, for example: check if LScache feature has been enabled in your license, if other cache plugins have been disabled, or if cache root and cache policy have been set, etc.