This is an old revision of the document!
How to Use WebP Format Images on Your WordPress Site
If you have WebP images in your media library, you take advantage of a setting in the LSCWP Media Settings to use WebP in place of JPG or PNG where appropriate.
Before enabling this option, you'll need to prepare your images in WebP format. You can do so with LiteSpeed's Image Optimization function or by converting the images yourself.
Setup WebP Replacement
- From the WordPress Dashboard, navigate to LiteSpeed Cache > Settings > Media
- Set Image WebP Replacement to
ON

Verify That it's Working
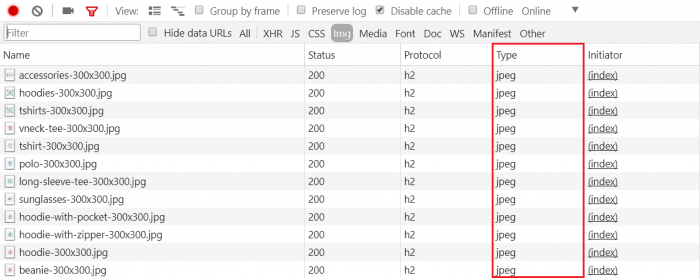
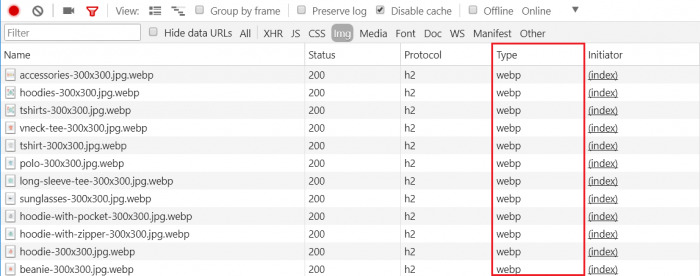
We setup the WooCommerce plugin with its built-in Storefront theme as our test scenario. It includes a default collection of JPG images.
Using Chrome's developer tool, we can verify that the JPGs have been replaced by WebPs.
Here is the WooCommerce default Storefront theme with demo products:

- Before WebP replacement:
- After WebP replacement:


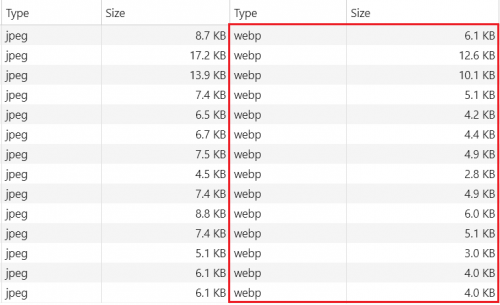
How much size reduced from WebP
- Check image size from browser developer tool
- Optimized jpg versus webp image size:
- Check images size from console
- Access to PATH_TO_WORDPRESS → wp-content → uploads → YEAR → MONTH
ls -alh | grep accessories-300
>>>
9.1K accessories-300x300.bk.jpg
8.6K accessories-300x300.jpg
6.0K accessories-300x300.jpg.webp

We can found original jpg image is 9.1K, optimized jpg file is 8.6k and webp only 6.0k. All image sizes are match to previous checking method of developer tool which need to minus header size. It's around 30% size reduced from JPEG which is a reasonable number by referring google webp
Debug
- Check following rules exist in .htaccess file
### marker WEBP start ### RewriteCond %{HTTP_ACCEPT} "image/webp" RewriteRule .* - [E=Cache-Control:vary=%{ENV:LSCACHE_VARY_VALUE}+webp] ### marker WEBP end ### - Check Debug log with Debug Advanced level
- If webp image not exist, you may see
Media: no file, bypassed