This is an old revision of the document!
LSCache + LiteSpeed WebADC
To enable cache on ADC, you will need to setup server-level cache root, virtual host level of cache root, and enable cache in the virtual host cache settings. On back-end web server, you will need to install litespeed cache plugin such as litespped cache plugin for wordpress or litemage plugin for magento etc. If there is no cache plugin available for that application yet, you can use rewrite rule to enable cache on virtual host setting of ADC.
Enable Cache on ADC with plugin on Backend web server
This guide explains how to enable cache on LiteSpeed WebADC to communicate with WordPress, Magento, or other web apps that use an LSCache plugin via the following structure:
LiteSpeed WebADC (With Cache) > Back end web server > WordPress Application
Enable cache on Web ADC
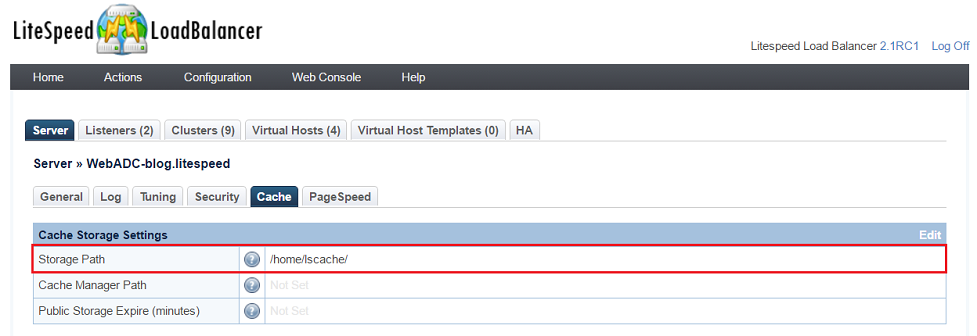
- Navigate to LSLB Web Admin Console→Server→Cache
- Set Storage Path to
/home/lscache/
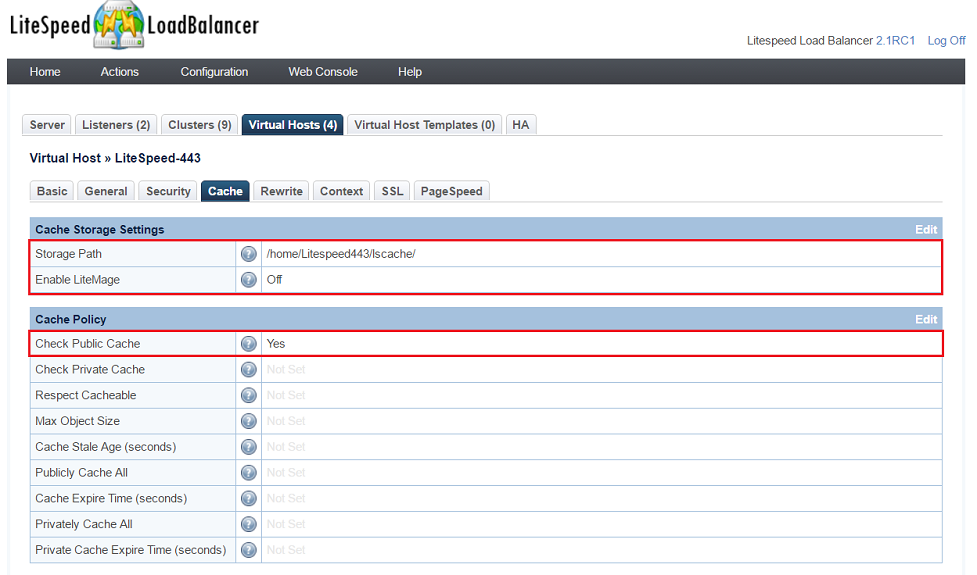
- Navigate to LSLB Web Admin Console→Virtual Hosts→Cache
- Set Storage Path to
/home/Litespeed443/lscache - Set Check Public Cache to
Yes
- Install and activate plugin for WordPress at backend web servers by following this Installation article
Note 1: The above steps are for most applications other than Magento. You will need to install Litespeed cache plugin for that application at back end server, which is recommended way. If there is no plugin available at this time, you can setup cache on ADC through rewrite rules on each virtual host.
Note 2: For Magento, you will need to set “Enable LiteMage” to “yes” on ADC and install LiteMage plugin at the backend of web servers.
Testing
You can check if a page is being cached from WebADC by:
- Navigating to your site from a non-logged-in browser and using your browser's developer tools to check the response header.
- Enter the URL
http://[Back_end_web_server_IP]/[wordpress-path]and check that there is no cache from response header. - Enter the URL
http://[Web_ADC_IP]/[wordpress-path]. Reload the page and look forX-LiteSpeed-Cache: hitin the response headers. If it's there, then the page is being served by the cache. - Modify a post with the WordPress application, then press Ctrl+F5 to refresh
http://[Web_ADC_IP]/[wordpress-path], you should see the updated posts.
Turning On the Web ADC Debug Log
To turn on the Web ADC Debug Log, you would follow the exact same steps that are laid-out here for LiteSpeed Web Server.

