This is an old revision of the document!
LiteSpeed Load Balancer (LSLB) Installation
LiteSpeed Load Balancer (LSLB) is an affordable, high-performance layer 7 HTTP load balancer application. LSLB is feature-rich, secure, and efficient, offering more flexibility than similarly-priced load balancing software. This makes it an excellent choice for small enterprises looking to scale their applications beyond one server — both to improve service speed as well as reliability in case of hardware failure.
More information: https://www.litespeedtech.com/products/litespeed-load-balancer/overview
In this guide we will be showing you how to download and install LSLB.
Prerequisites
- A server running Linux or FreeBSD 6.x to install LSLB to.
- A valid LSLB License.
Note: It is recommended to run LSLB on a machine separate from your web servers. It is also recommended that you have a dual NIC setup for your LSLB machine. One NIC with an assigned public IP address to handle public facing traffic, and one NIC in a private network with its own subnet (10.x.x.x or 192.168.x.x),VLAN, or dedicated switch to handle traffic between LSLB and the backend.
Licensing Options
Download
Download the latest version of LSLB to the root directory of the machine you will be using to run it and uncompress the downloaded file. We will be using LSLB 1.8 in this guide.
For example:
#cd /root
#wget https://www.litespeedtech.com/packages/lslb/lslb-1.8-i386-linux.tar.gz
#tar -zxvf lslb-1.8-i386-linux.tar.gz
Installation
Now that we have LSLB downloaded, let's install it and configure for our two hypothetical servers.
Enter the now uncompressed lslb-1.8 directory
cd lslb-1.8
Place your “trial.key”/“serial.no” file in this directory (/root/lslb-1.8) and ensure that http://license.litespeedtech.com is reachable from your server before continuing.
Run the installation script
./install.sh
Agree to the License agreement and specify the following recommended installation directory:
Do you agree with above license? Yes
Destination [/opt/lslb]: /usr/local/lslb
You will now be asked some simple configuration questions which will be explained below. Default values will be presented in brackets, such as “[admin]”. The default value for y/n questions will be capitalized. You can press the return key to select the default value when applicable.
- User name: The username used to log in to the LSLB WebAdmin Console. Default value is “admin”.
- Password: The password used to log in to the LSLB Webadmin Console. Must be at least 6 characters long.
- User: The user that LSLB will be running as. For security reasons, you should choose a non-system user who does not have a login shell and home directory, such as “nobody”. Default value is “nobody”.
- Group: The group that the load balancer will be running as. You will also be provided with a list of groups that your previously selected “User” is a member of. Default value is “nobody”.
- HTTP port: Specifies the port that LSLB will listen on. Port 80 is the standard HTTP port, so it is recommended to either stop any server you may have running on this port or change said servers port number so that you can use port 80 for LSLB. Default value is 8090.
- Admin HTTP port: The port used for the LSLB WebAdmin Console. Once set, you can access the LSLB WebAdmin Console through http://Host_IP_Address:Admin_Port. You can replace “Host_IP_Address” with “localhost” if accessing through your LSLB machine. Default value is 7090.
- Enable chroot: Allows you run LSLB in a chroot environment. This will limit the LSLB process and its children processes from accessing files outside of the new chroot directory, adding an extra layer of security. Default value is “N” for no.
- Chroot directory: The new root directory for the LSLB process (entered without a trailing “/”). Specified when selecting “y” for “yes” to the “Enable chroot” setting.
LSLB will now attempt to install. If successful, you will be asked if you would like LSLB to start automatically when your machine starts and if you would like to start LSLB now. The default values for both of these questions is “Y” for “yes”.
Basic Configuration
This section will cover a basic LSLB configuration using a LSLB server as well as 2 (or more) web servers running on separate machines from one another. For simplicity, we will be assuming 2 web servers with LSLB configured to handle HTTP traffic to a single site being hosted on both of these servers. If you would like to use LSLB for a different application, simply replace “clusterHTTP” in this guide with the appropriate cluster type (AJP,LSAPI,FCGI,MIX).
To start, log in to your LSLB WebAdmin Console using the IP address of your LSLB server and the port number you assigned the LSLB WebAdmin Console during installation. We will be using “192.168.0.10” as our LSLB IP address and the default port “7090” for the LSLB WebAdmin Console.
http://192.168.0.10:7090
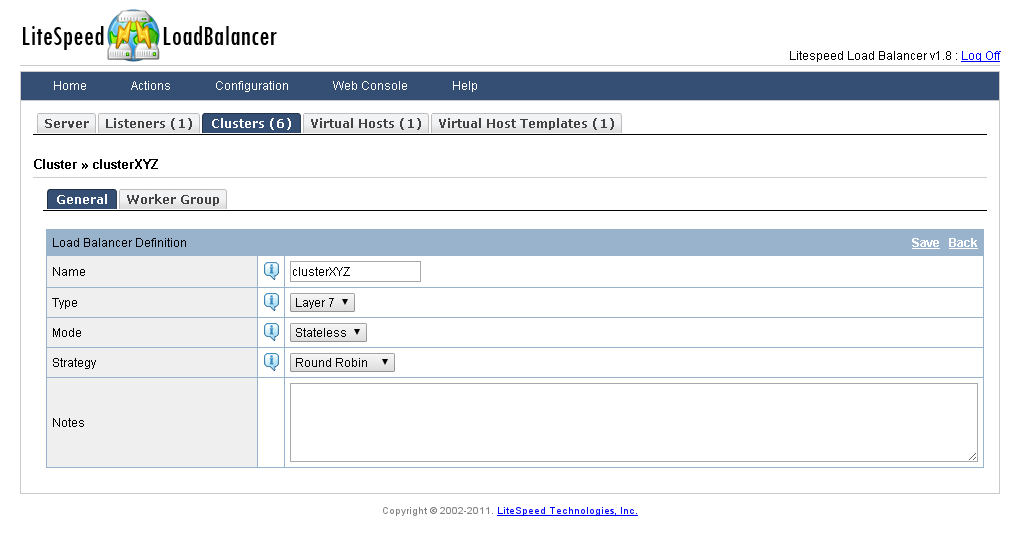
Once you have logged in, navigate to Configuration » Clusters and click “Add” at the top right of “Clusters List”.
Here we will be defining a new cluster as follows:
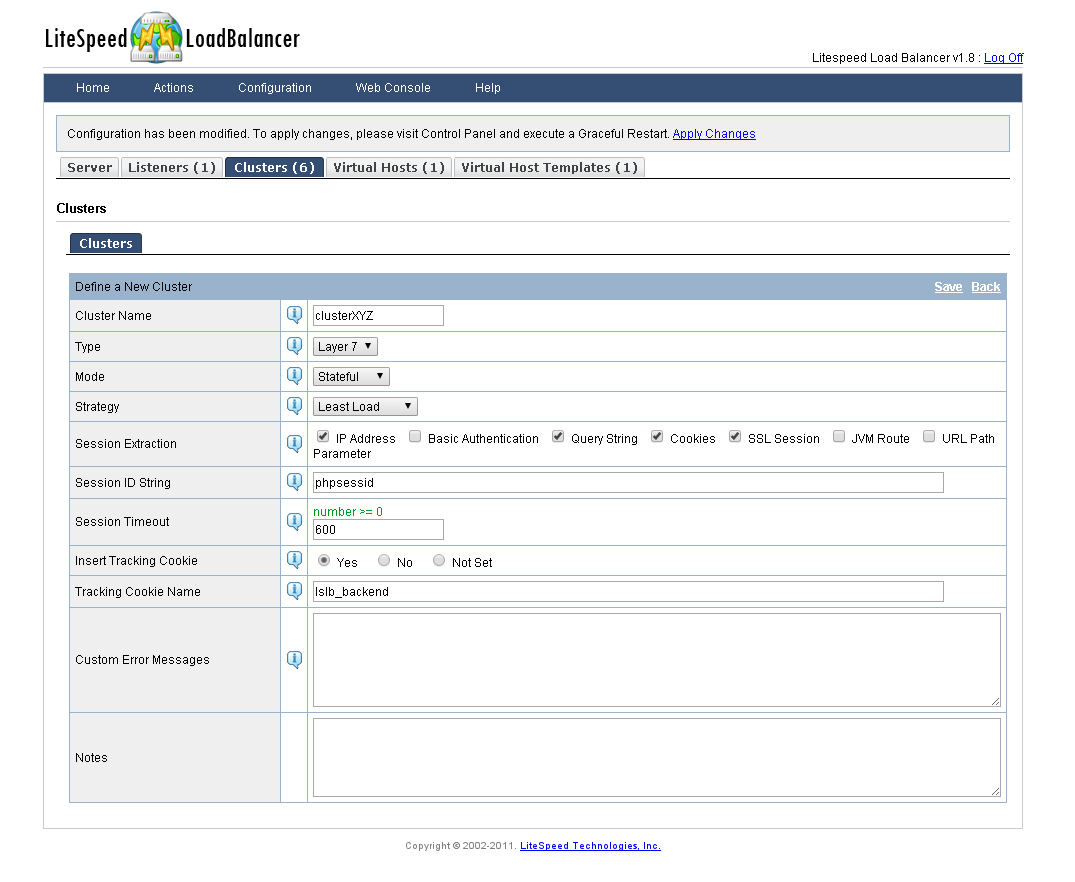 Click “Save” at the top right.
Now that we have our cluster defined, let's define a worker group for this cluster where we will be adding in our two web servers as nodes. We will be using “192.168.0.15:81” and “192.168.0.16:82” as our two web servers and ports. Replace these values the IP addresses and ports of your own web servers.
While still viewing the “clusterXYZ” cluster, click the tab for “Worker Group”, and then click “Add”. Define the worker group as follows:
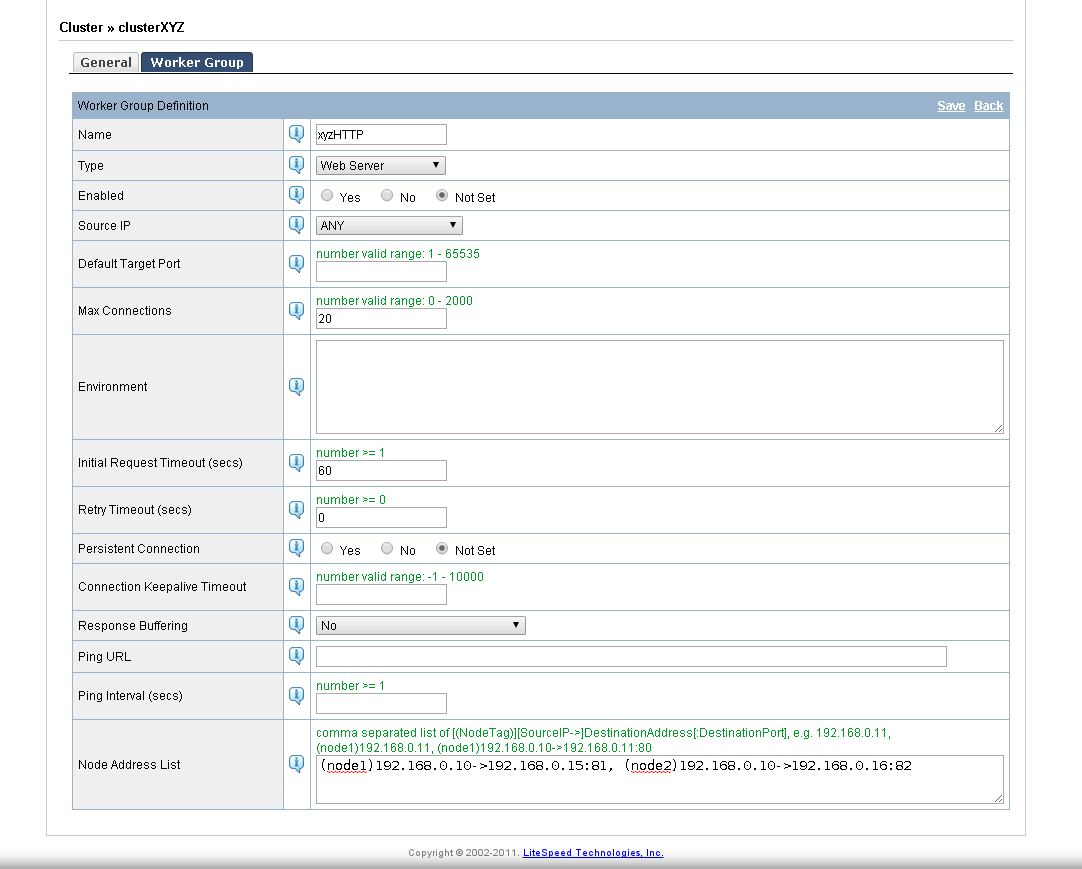
Where “Node Address List” is a comma separated list in the form:
(Node_Tag)LSLB_IP_Address->Destination_IP_Address:Destination_Port
Click “Save” at the top right.
With our cluster fully configured and our web servers added as nodes to a worker group in said cluster, let's create our LSLB virtual host.
Navigate to Configuration » Virtual Hosts.
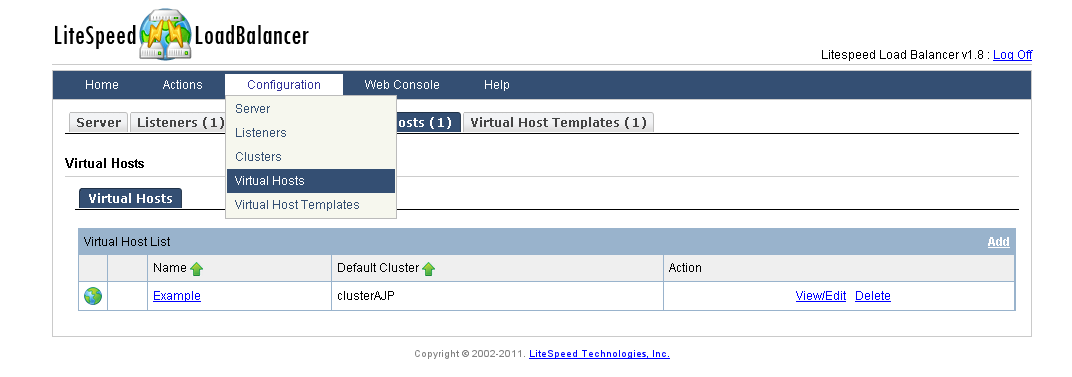
Since we will now be creating our own virtual host, we no longer need the “Example” host. Delete “Example” by clicking “Delete” in the “Action” section for this host and then clicking “Yes” to the confirmation message on the resulting page.
Back in Configuration » Virtual Hosts, click “Add” at the top right of “Virtual Host List”.
Choose a “Virtual Host Name”, select “clusterXYZ” for “Default Cluster” to specify that this virtual host will be handling HTTP traffic, enter a location for this virtual host's configuration file. For example:
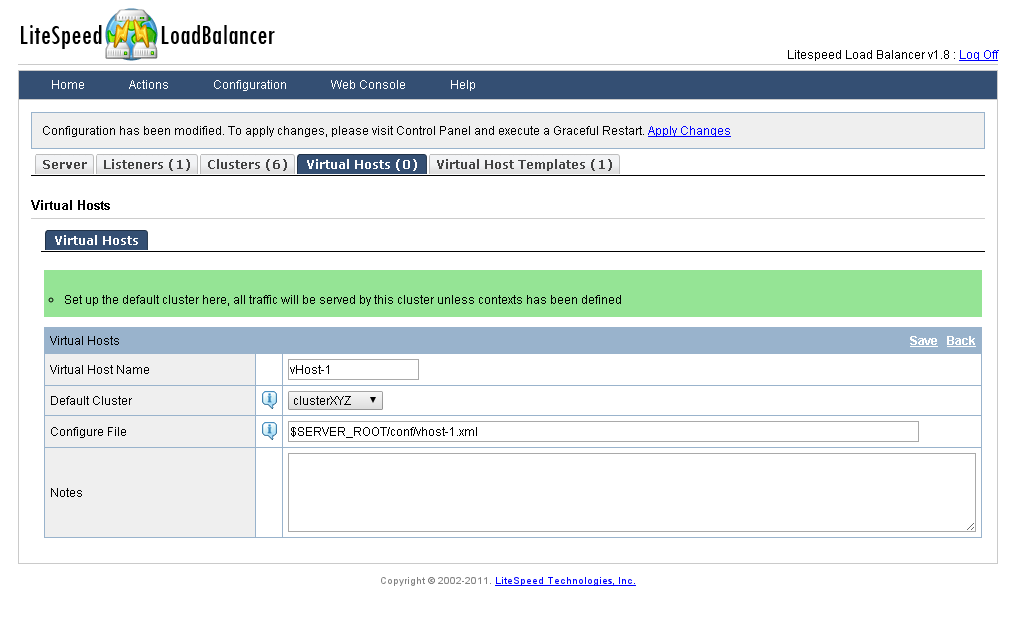
Click “Save” at the top right.
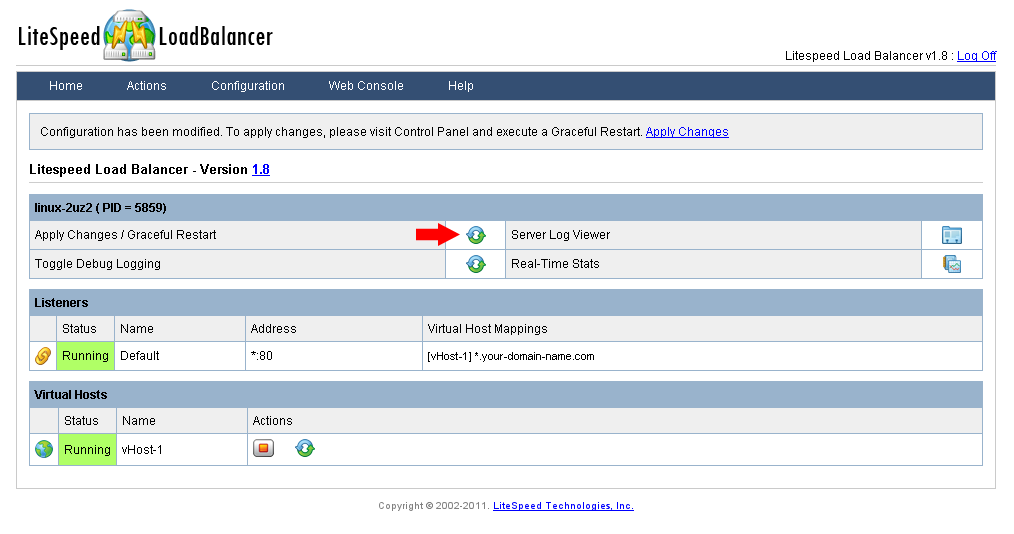
Now that we have a LSLB virtual host configured, the final step is to set a listener for the LSLB virtual host. The “Default” listener should already be configured for the port you specified during installation, so lets check that by clicking “View/Edit”.
Here you should see that under “Virtual Host Mappings”, the “Example” virtual host is still mapped to this listener.
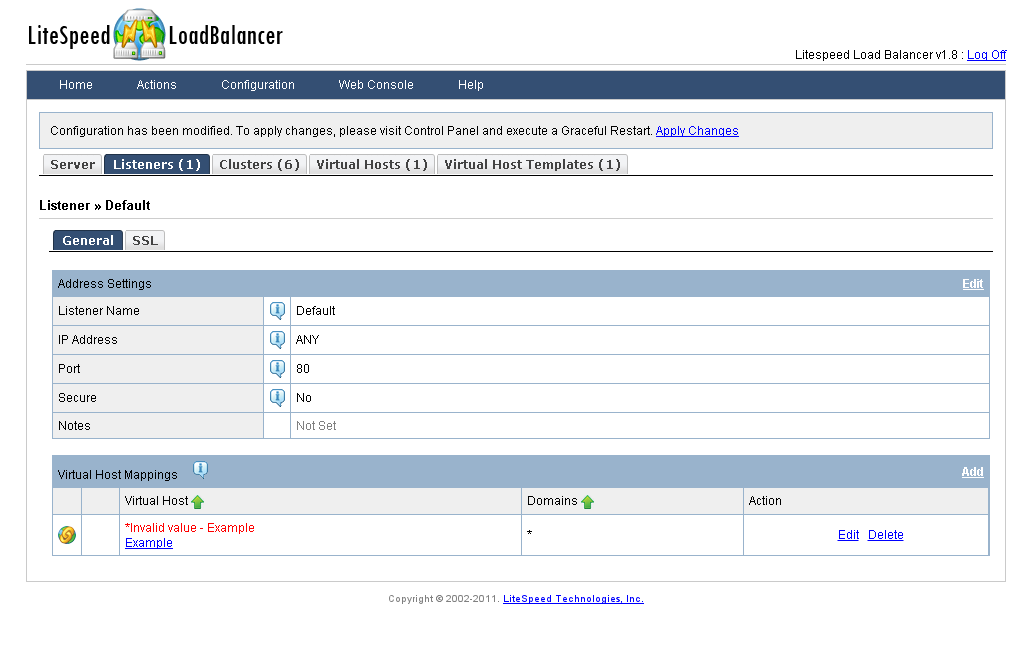
Because we deleted this virtual host earlier, we should also delete the mapping by again clicking “Delete” under the “Action” section and then clicking “Yes” to the confirmation message on the resulting page.
Since we created our own LSLB Virtual host earlier, we can now add it to “Virtual Host Mappings” by clicking “Add” and selecting it as well as entering your sites domains in the comma seperated “Domains” list.

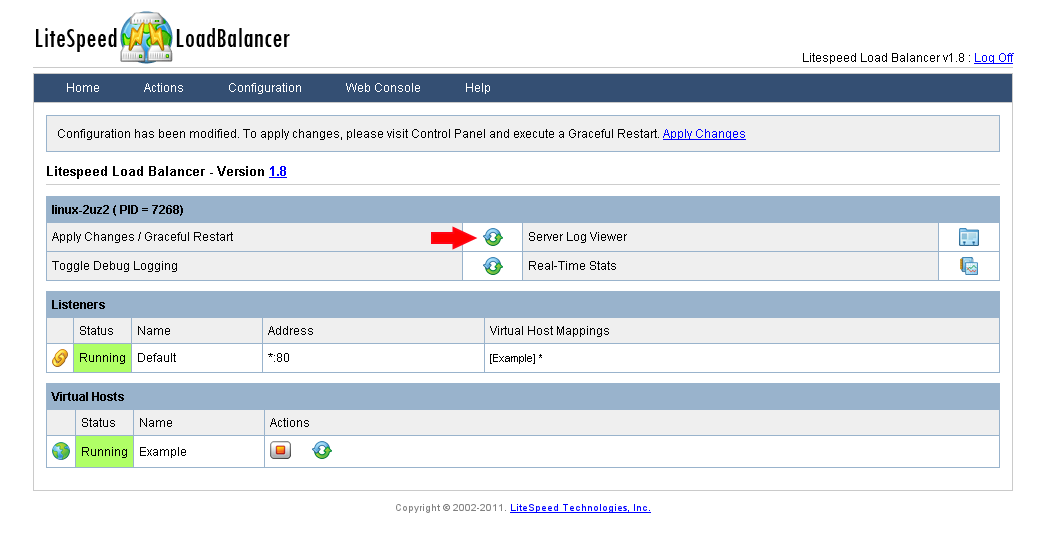
Click “Save” at the top right and apply changes with a “Graceful Restart”.
Before:
After:
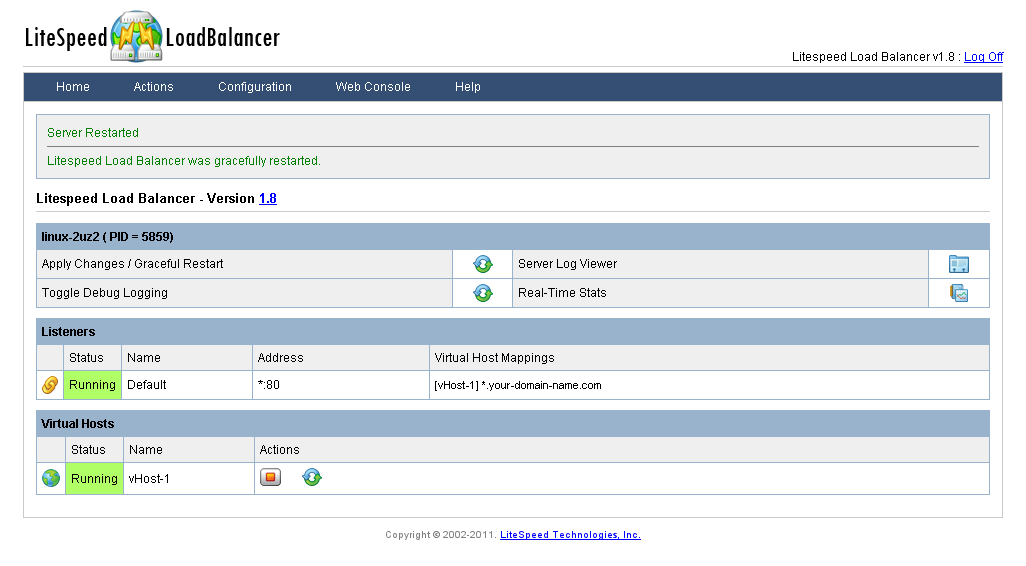
Your LiteSpeed Load Balancer should now be working and ready to handle all incoming HTTP traffic to your specified port/site!
Testing
Below are 2 methods of testing that LSLB is configured correctly and working. We will again be assuming 2 web servers with LSLB handling HTTP requests to a web site hosted on both of these servers, but these tests can me modified to test other applications of LSLB as well.
For both tests: Run your servers in an isolated environment (no outside traffic) and make a small but noticeable change to the home page of one of your web servers.
Test 1: Disabling One Of Two Web Servers
Aside from balancing your servers traffic as to not cause a crash, one of the main features of a load balancer is to appropriately redirect traffic to an available server if one should experience a failure. With two servers running this is an easy thing to check.
To begin, visit your site through a browser and make note of which server you are being directed to with respect to the small change you made earlier, we will call this server “Server 1”. If your “Mode” is set to “Stateful” under “Load Balancer Definition” in Configuration » Clusters » < your_HTTP_cluster >, then this server (Server 1) will be the preferred server for LSLB to direct your IP address to. This is also known as “Session Affinity”.
Now that we know which server you are being directed to, either stop Server 1 or change Server 1's port to a number LSLB is not aware of and restart it to have this change take affect. If everything is working correctly, the next time you attempt to visit your site, LSLB will instead redirect your request to Server 2, which you can again confirm with respect to the small change made earlier.
Test 2: Round Robin
From the LSLB Web Admin Console, navigate to Configuration » Clusters. Select the cluster you are using to direct HTTP traffic to your site, in our cause this is “clusterXYZ”. Click “Edit” at the top right of the “Load Balancer Definition” section.
Change “Mode” to “Stateless” and “Strategy” to “Round Robin”.
Click “Save” at the top right.
By choosing “Stateless”, you have told LSLB to not consider “Session Affinity” for this cluster. Meaning that you are equally likely to be sent to Server 1 or Server 2 on an HTTP request for your site. By choosing “Round Robin”, you have told LSLB to rotate back and forth between Server 1 and Server 2 when receiving HTTP requests for your site.
Perform a “Graceful Restart” of LSLB.
Because of possible browser caching, this next part is best done through the terminal.
Use the following terminal command to request your web page. For this example our domain name is yoursitename.com, replace this with your own domain name or the IP address and port of your LSLB server.
curl -i yoursitename.com
or
curl -i 192.168.0.10:80
Run this command a few times to check if LSLB is correctly swapping back and forth between Server 1 and Server 2 by checking for the small change made earlier. The output should be similar to Server 1 → Server 2 → Server 1 → Server 2… and so on.
Note: It is recommended to set “Mode” and “Strategy” back to your previous settings when done performing this test. The default settings are “Stateful” and “Least Load” respectively.