This is an old revision of the document!
LiteMage Configuration File And Customization
LiteMage's “config.xml” file, located under “app/code/community/Litespeed/Litemage/etc/config.xml”, is based on Magento's sample store data. If you have a customized Magento setup, you may need to add additional ESI blocks or events there.
Block Type Denoted By “T:“
In previous versions of LiteMage you needed to explicitly change or add blocks that have been re-named by installed extensions. As of version 1.0.4, most custom blocks will be detected automatically by type.
For example, the “cart” block should look something like this:
 <cart>
   <access>private</access>
   <blocks>T:Mage_Checkout_Block_Cart_Abstract</blocks>
   <purge_events>
     <sales_quote_save_after/>
   </purge_events>
 </cart>
Where instead of listing out each individual “cart” block by name in the <blocks> section, we use the type indicator prefix “T:” along with the inherited Magento class for “cart” type blocks to get “T:Mage_Checkout_Block_Cart_Abstract”. Now any blocks that inherit this type will be automatically detected and included.
Purge Tags
Also new in LiteMage 1.0.4 are the inclusion of purge tags. These changes the block into a composite block that uses the combined purge events of other existing blocks without having to redefine those purge events in the block itself.
For example:
<toplinks>
  <access>private</access>
  <blocks>top.links</blocks>
  <purge_tags>cart, wishlist</purge_tags>
</toplinks>
Here the “top.links” block is using the purge tags “cart” and “wishlist” instead of explicitly re-listing these purge events for these blocks in a <purge_events> section. This will cause the “top.links” block to be purged whenever an event would cause either the “cart” or “wishlist” blocks to be purged.
Valueonly Blocks Denoted By “$v”
Marking a block as valueonly will keep the HTML tags and comments surrounding a value in an HTML text field from being output when in debug mode. This is important in keeping behavior consistent between viewing a page normally or in debug mode. Valueonly blocks will also not appear when using the “LITEMAGE_DEBUG=SHOWHOLES” parameter to highlight injected blocks on a page.
To mark a block as valueonly, use the suffix “$v”. For example:
<welcome>
  <access>private</access>
  <blocks>welcome, litemage.jsvar,nickname$v</blocks>
</welcome>
Where the “nickname” block has been marked as valueonly.
Hole-punching Dynamically Created Blocks From A Template
As of LiteMage 1.0.6, you can now hole-punch dynamically created blocks from a template. LiteMage injects after the layout files are loaded and all blocks are generated. This works for most cases, but when a template block is rendering, it can dynamically create a block that is not defined in the layout file.
For example, in a customized template, the “customer/form_login” block can be overridden with a local implementation. This local implementation will be displayed in the block header, such as:
default/ma_pisces_sport/template/page/html/header.phtml:
<?php echo
$this->getLayout()->createBlock('customer/form_login')->setTemplate('customer/form/mini.login.phtml')->toHtml(); ?>
This block contains private information for the logged in customer, and so a hole must be punched here. Unfortunately LiteMage would have no knowledge of this new block. In order to notify LiteaMage to inject here, you must add a special attribute to the block. You need to change the above code to conatain two new parameters, “litemage_dyn1” and “$litemage_attr”:
<?php
  $litemage_attr = array('litemage_dynamic' =>
                      array('tag' => 'welcome', 'access' => 'private', 'type' => 'customer/form_login',
                            'template' => 'customer/form/mini.login.phtml'));
echo $this->getLayout()->createBlock('customer/form_login', 'litemage_dyn1',
$litemage_attr)->setTemplate('customer/form/mini.login.phtml')->toHtml(); ?>
“litemage_dyn1” is any unique block name. For example, if you have a second dynamic block, you need to name it something like “litemage_dny2” to keep it unique.
“$litemage_attr” contains the following injection information:
- “litemage_dynamic”: A fixed key string that LiteMage uses to detect this special block attribute.
- 'tag': (Optional) The default value is 'welcome' which will purge by log in/log out events. You can also set this to any tag previously defined in “config.xml”. If you need to define a new purge event or combination of purge events for this block, create a new tag in “config.xml” with the desired purge events and use that tag value here.
- 'access': Can be set to either “public” or “private”.
- 'type': The first parameter in the createBlock() function.
- 'template': (Optional) If the block has a template set, as in the above case, you must provide that template here.
LiteMage will detect this special block attribute by the fixed key string “litemage_dynamic”, which you can also see above.
Note: When testing, be sure to use “Enable LiteMage Cache Only for Listed IPs” (see full explanation in the Configuration Notes section below). This setting specifies certain IPs that will test caching while other IPs are served normally.
Custom ESI Block Structure And Purge Events
Custom ESI Block Structure
ESI blocks are grouped by common purge events. If you feel as though none of the current groupings fit what you want to accomplish, you can add your own custom grouping to the <frontend> → <litemage> → <esiblock> section of LiteMage's “config.xml” file. The general structure for an ESI block is:
<unique_group_tag>
  <access> ...  </access>
  <blocks> ... </blocks>
  <purge_events> ... </purge_events>
  <purge_tags> ... </purge_tags>
</unique_group_tag>
Where:
- <unique_group_tag>: The unique name you want to assign this grouping. Can contain letters, digits, and the following special characters: '.','_',and '-'. Do not use any spaces.
- <access>: Can be set to “public” or “private”.
- <blocks>: A combination of block types (where all blocks that inherit this type will automatically be included) and individual block names.
- <purge_events>: A combination of events present in the <frontend> → <events> section that, when triggered, will cause this grouping of blocks to be purged.
- <purge_tags>: A list of the “Unique Group Tags” of other ESI block groupings. The triggering of purge events for any grouping present in this list will also cause this grouping to also be purged.
Your custom grouping can either use purge events, purge tags, or both.
Custom Purge Events
If you would like to add additional purge events not currently present in LiteMage's “config.xml” file, you can do so by adding the event and its observer to the <frontend> → <events> section. The general structure for a purge event is:
<magento_event_name>
  <observers>
    <litemage_esi>
      <class>litemage/observer_esi</class>
      <method>purgeEsiCache</method>
    </litemage_esi>
  </observers>
</magento_event_name>
Where:
- <magento_event_name>: The name of a new existing Magento event not currently present in the <events> section.
This uses the predefined “purgeEsiCache” method to purge any ESI block groupings that are using this purge event from the cache whenever this event is triggered.
Single Language Sites
LiteMage's “config.xml” file contains a rewrite for Magento's translate line to fix a bug. If you intend to only use a single language for your store, you may remove this rewrite for a possible performance improvement. The rewrite is located near the start of “config.xml” in <config> → <global> → <models> and will look like the following:
<core>
  <rewrite>
    <translate>Litespeed_Litemage_Model_Translate</translate>
  </rewrite>
</core>
List Customized Block Names For "welcome" And "toplinks" Tags
As of LiteMage 1.0.8, we have introduced two new fields to LiteMage's “User-Defined Cache Rules” under System » Configuration » LITEMAGE CACHE » LiteMage Configuration in the Magento Admin Panel. These fields are “Customized Block Names for 'welcome' Tag ” and “Customized Block Names for 'toplinks' Tag”, which are input as comma separated lists.
Both the “welcome” and “toplinks” tags are predefined in LiteMage's “config.xml” file, with “welcome” blocks being purged by log in/out events and “toplinks” blocks being a composite grouping of both the “cart” and “wishlist” tags, which will be purged by cart and wishlist changes respectively.
While these changes can still be made within LiteMage's “config.xml” file, it is more convenient to do so through these fields. The reason for this is that when LiteMage is updated, it's “config.xml” file is overwritten, requiring you to re-add these changes to the new file with every update. But, if these changes are made through LiteMage's configuration settings in the Magento Admin Panel, the changes are saved to the Magento database and will remain persistent through updates; no need to re-add!
(It is not necessary to have other predefined tags configurable from within the Magento Admin Panel as they are already intelligently detected by class type, which would cover most use cases.)
Important Note About Updating
Updating LiteMage will overwrite LiteMage's “config.xml” file. Before you update, make sure to copy and save your “config.xml” file if you have made any customizations.
Magento Configuration
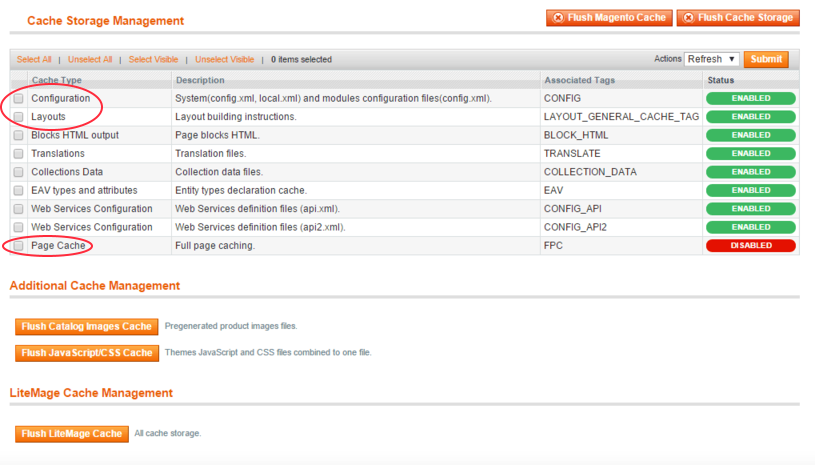
- For LiteMage to work correctly, you must have both “Configuration” and “Layouts” enabled under System → Cache Management in the Magento Admin Panel. If you are using Magento Enterprise, you must also disable “Page Cache”.
LiteMage Extension For Magento Configuration
- LiteMage's default configuration should be suitable for testing.
- Always read the comments for each configuration option before adjusting them.
- Detailed notes on certain settings are provided in the “Notes on Specific Configuration Settings” section below.
When Changing LiteMage Configuration
In The Magento Admin Panel
After making any changes to LiteMage through the Magento Admin Panel, always Flush the LiteMage cache by navigating to System → Cache Management and, under “LiteMage Cache Management, clicking “Flush LiteMage Cache”.
In The “config.xml” File
After Making any changes to LiteMage through it's “config.xml” file, you must do the following:
- From the Magento Admin Panel, navigate to System → Cache Management.
- Check the box next to “Configuration” and check that “Refresh” is selected in the drop-down menu on the top right before clicking “Submit”.
- Near the bottom of the page under “LiteMage Cache Management”, click “Flush LiteMage Cache”.
Notes On Specific Configuration Settings
- Default Private Cache TTL: Should not be set higher than the Cookie Lifetime setting (System → Configuration → Web). The default Cookie Lifetime value is 3600.
- Enable Cache Warm Up: Because LiteMage is encrypted, the Magento cron.sh must use a PHP with IonCube Loader. Updating the cron.sh PHP_BIN setting to “PHP_BIN=/usr/local/lsws/fcgi-bin/lsphp5” will connect it to LSWS's PHP. (How to set up the Magento cron job: http://www.magentocommerce.com/wiki/1_-_installation_and_configuration/how_to_setup_a_cron_job )
- Enable LiteMage Cache Only for Listed IPs: This setting is used to allow administrators to test caching from certain IPs on a production server. When you are ready to use LiteMage Cache for all users, leave this setting blank. After updating this setting, flush LiteSpeed's cache (System → Cache Management). This will get rid of the cached copies made during testing (which cannot be served to normal users).
- Track Recently Viewed Products: Recommend setting to “No” if your template does not show last viewed items. If set to “Yes”; every time a product page is viewed it must be recorded in Magento's backend database, initializing the Magento framework and greatly slowing down the site. If you would like to know how to disable the “recently viewed products” block from your template, try this guide from TemplateMonster.
- Flush LiteMage Cache: The Flush LiteMage Cache button (under System → Cache Management) flushes all public and private caches. Cache Warm Up (if enabled) will also be started automatically after the cache is flushed. Disabling LiteMage through LiteMage Configuration will also cause the cache to be flushed.