This is an old revision of the document!
Important Note About Updating
Updating LiteMage will overwrite LiteMage's “config.xml” file. Before you update, make sure to copy and save your “config.xml” file if you have made any customizations.
Magento Configuration
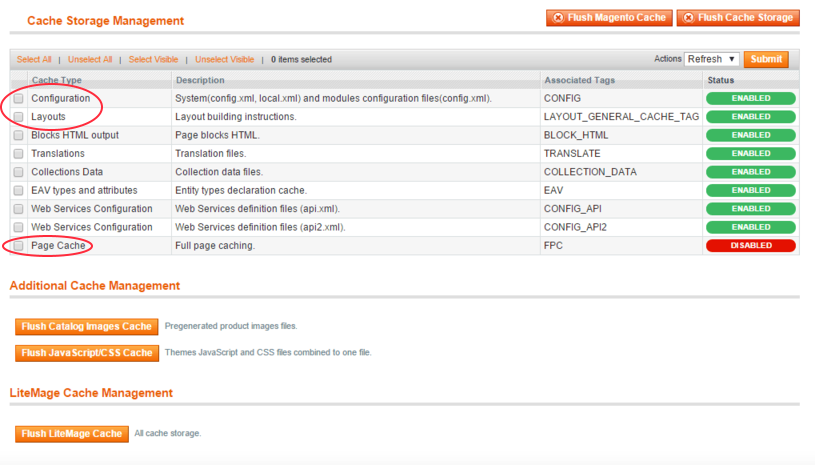
- For LiteMage to work correctly, you must have both “Configuration” and “Layouts” enabled under System → Cache Management in the Magento Admin Panel. If you are using Magento Enterprise, you must also disable “Page Cache”.
LiteMage Extension For Magento Configuration
- LiteMage's default configuration should be suitable for testing.
- Always read the comments for each configuration option before adjusting them.
- Detailed notes on certain settings are provided in the “Notes on Specific Configuration Settings” section below.
When Changing LiteMage Configuration
In The Magento Admin Panel
After making any changes to LiteMage through the Magento Admin Panel, always Flush the LiteMage cache by navigating to System → Cache Management and, under “LiteMage Cache Management, clicking “Flush LiteMage Cache”.
In The “config.xml” File
After Making any changes to LiteMage through it's “config.xml” file, you must do the following:
- From the Magento Admin Panel, navigate to System → Cache Management.
- Check the box next to “Configuration” and check that “Refresh” is selected in the drop-down menu on the top right before clicking “Submit”.
- Near the bottom of the page under “LiteMage Cache Management”, click “Flush LiteMage Cache”.
Notes On Specific Configuration Settings
- Default Private Cache TTL: Should not be set higher than the Cookie Lifetime setting (System → Configuration → Web). The default Cookie Lifetime value is 3600.
- Enable Cache Warm Up: Because LiteMage is encrypted, the Magento cron.sh must use a PHP with IonCube Loader. Updating the cron.sh PHP_BIN setting to “PHP_BIN=/usr/local/lsws/fcgi-bin/lsphp5” will connect it to LSWS's PHP. (How to set up the Magento cron job: http://www.magentocommerce.com/wiki/1_-_installation_and_configuration/how_to_setup_a_cron_job )
- Enable LiteMage Cache Only for Listed IPs: This setting is used to allow administrators to test caching from certain IPs on a production server. When you are ready to use LiteMage Cache for all users, leave this setting blank. After updating this setting, flush LiteSpeed's cache (System → Cache Management). This will get rid of the cached copies made during testing (which cannot be served to normal users).
- Track Recently Viewed Products: Recommend setting to “No” if your template does not show last viewed items. If set to “Yes”; every time a product page is viewed it must be recorded in Magento's backend database, initializing the Magento framework and greatly slowing down the site. If you would like to know how to disable the “recently viewed products” block from your template, try this guide from TemplateMonster.
- Flush LiteMage Cache: The Flush LiteMage Cache button (under System → Cache Management) flushes all public and private caches. Cache Warm Up (if enabled) will also be started automatically after the cache is flushed. Disabling LiteMage through LiteMage Configuration will also cause the cache to be flushed.