This is an old revision of the document!
How to enable cache on LiteSpeed ADC
To enable cache on ADC, you will need to set up a server-level cache root, a virtual-host-level cache root, and enable cache in the virtual host cache settings. On the backend web server, you will need to install a LiteSpeed Cache plugin such as LiteSpeed Cache for WordPress plugin or LiteMage for Magento extension, etc. If there is no cache plugin available for your application yet, or the backend end server with a third party and impossible to enable litespeed cache plugin on it, you can use rewrite rules to enable caching on the virtual host setting of Web ADC.
Enable Cache on ADC With Plugin on Backend Web Server
Enabling cache on ADC through a backend cache plugin is the recommended way since it is super easy for you to configure. The backend cache plugin manages most situations for you automatically, avoiding any manual configuration of rewrite rules.
The following explains how to enable cache on LiteSpeed Web ADC to communicate with WordPress, Magento, or other web apps that use an LSCache plugin via the following structure: LiteSpeed Web ADC (With Cache) > Back end web server > WordPress Application
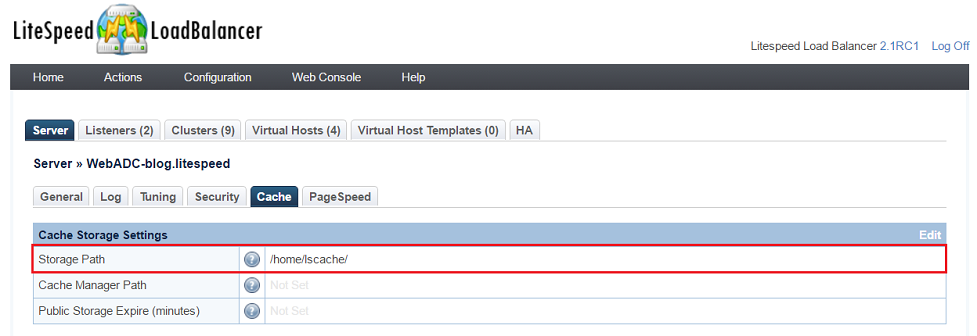
Set Server-Level Cache Root on Web ADC
Set Virtual-Host-Level Cache Root on Web ADC
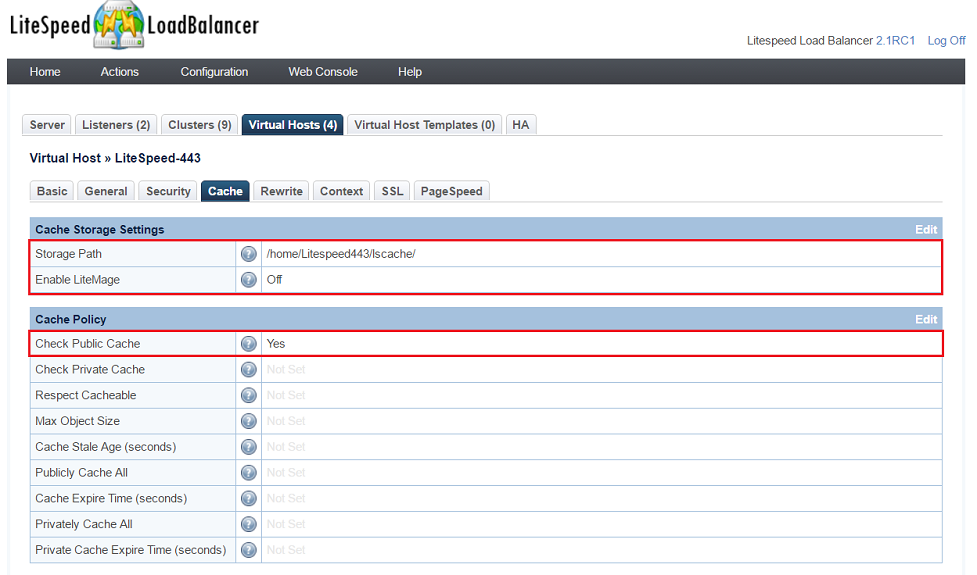
* Navigate to LSLB Web Admin Console > Virtual Hosts > Cache
* Set Storage Path to /home/Litespeed443/lscache
Enable Cache on ADC
- Set Check Public Cache to
Yes
- Set Check Private cache normally leave it as blank at most of the cases. Set it to
Yesonly if there is a private ESI block.
Install and Activate LiteSpeed Cache Plugin on Backend Web Server
Install and activate your plugin according to that plugin's directions:
Note 1: If there is no plugin available at this time, you can setup cache on ADC through rewrite rules on each virtual host.
Note 2: For Magento, you will need to set Enable LiteMage to yes on ADC and install the LiteMage plugin at the backend of web servers.
Enable Cache on ADC Without Plugin on Backend Web Server
If a LiteSpeed cache plugin is not available, or the backend end server with a third party and impossible to enable litespeed cache plugin on it, or you still prefer to centralize all cache settings on ADC instead of backend server, you can enable it on ADC through rewrite rules under virtual host/context. The advantage of this will be centralized cache management on ADC. The disadvantage of this is far fewer situations the rewrite rules can handle than with a cache plugin. No universal rules can fit everything. Also for different backend applications, you will need to set different rules to fit the requirements of that application. This is far more complicated than just selecting “Yes” and letting litespeed cache plugin to do all the rest for you automatically, right!? Don't worry, we are working on the rest of popular application cache plugins and will try to make them available as soon as we can.
The rewrite rules are similar to those on LSWS and you can check here for examples and details.
The following will give you an example on how to enable cache for Joomla:
The first three steps will be same as above for server-level cache root setup, virtual-host-level cache root setup and enabling cache in ADC settings. The difference is the fourth step: configure rewite rules on ADC virtual host instead of installing cache plugin on backend web server.
Set Server-Level Cache Root on Web ADC
Set Virtual-Host-Level Cache Root on Web ADC
* Navigate to LSLB Web Admin Console > Virtual Hosts > Cache
* Set Storage Path to /home/Litespeed443/lscache
Enable Cache on ADC
Set Rewrite Rules to Configure Cache
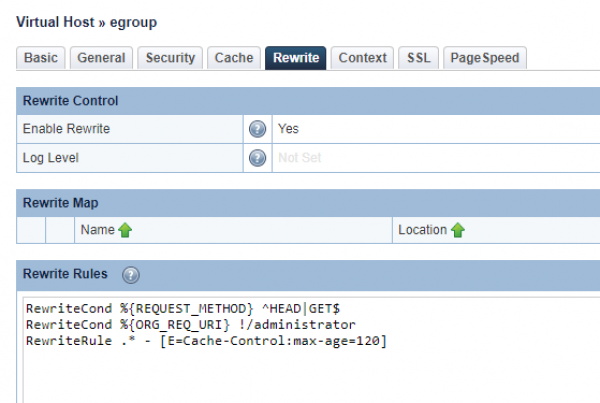
Set rewrite rules under rewrite tab (make sure rewrite is enabled in the settings):
RewriteCond %{REQUEST_URI} ^.*\.(jpg|css|js|gif|png|svg)$ [NC]
RewriteRule .* - [E=Cache-Control:no-cache]
RewriteRule ^/(solutions|error-page|products) - [E=Cache-Control:max-age=120]
The above is only an example. You can set rules according to your need. You can also create some contexts if required and set rules there.
Testing
You can check if a WordPress page is being cached from Web ADC by:
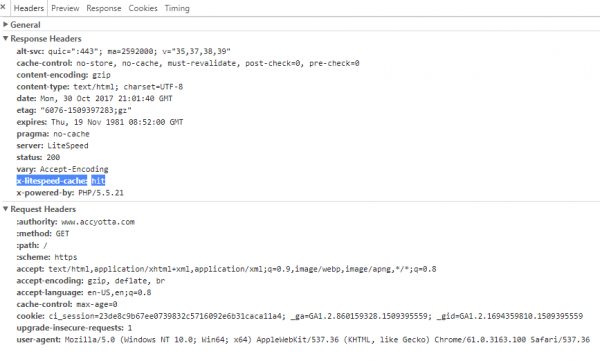
- Navigating to your site from a non-logged-in browser and using your browser's developer tools to check the response header.
- Enter the URL
http://[Back_end_web_server_IP]/[wordpress-path]and check that there is no cache from response header. - Enter the URL
http://[Web_ADC_IP]/[wordpress-path]. Reload the page and look forX-LiteSpeed-Cache: hitin the response headers. If it's there, then the page is being served by the cache. - Modify a post with the WordPress application, then press Ctrl+F5 to refresh
http://[Web_ADC_IP]/[wordpress-path], you should see the updated posts.
Will I see "Cache-Control:max-age" header" when I use lscache?
No. Please be aware there are two different concepts: Cache-Control:max-age is a regular cache response header which controls the cache behavior of a browser or public proxy, not LSCache from the server side. While [E=cache-control:max-age=120] is to control LiteSpeed's internal server cache and won't affect browser cache.
Our cache engine won't insert the regular client/browser Cache-Control header because it is not desired to let the browser or proxy cache the dynamic content. This would remove cache control from the server, and if LSCache no longer has control, it will be unable to purge updated content. As a result, the browser will serve out-of-date pages.
x-litespeed-cache-control is on our ADC to do list.
If there is still a need to let the browser cache content, you can configure the backend to insert regular “Cache-Control” headers.
Turning On the Web ADC Debug Log
To turn on the Web ADC Debug Log, you would follow the exact same steps that are laid-out here for LiteSpeed Web Server.


