This is an old revision of the document!
LiteMage 2 troubleshooting for Magento 2
"Your installation of LiteSpeed Web Server does not have LiteMage Cache enabled"
You may see some message like the following:
Your installation of LiteSpeed Web Server does not have LiteMage Cache enabled. Please make sure your LiteSpeed license includes the LiteMage cache module, and LiteMage is turned on in the .htaccess file in the root directory of your Magento installation.
It is pretty much self-explained. You need to check the license or .htaccess file “LiteMage On”.
"LiteMage Cache on LiteSpeed Web Server" Full Page Cache Option Not Appearing
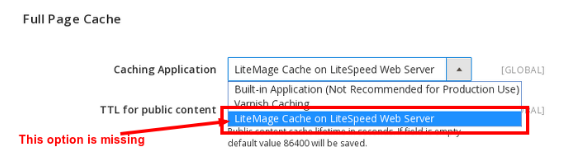
There are a few known reasons for this problem:
- Your LiteSpeed license does not have the LiteMage module enabled. While all trial licenses include LiteMage unlimited, the LiteMage add-on must be added to new and existing licenses. Learn how to Add a Cache Module.
- Your Magento installation's .htaccess file does not contain the “LiteMage on” directive.
- If you are a shared hosting account user, you need to confirm with your host that if they have enabled LiteMage feature for your account.
Response Header Does Not Contain "X-LiteSpeed-Cache: hit,litemage"
Is Litemage included in your license?
Check the license to ensure that the LiteMage feature is inluded.
Is LiteMage on in .htaccess?
Check your .htaccess file to ensure you see LiteMage On.
Are you using a LiteSpeed web server?
Check the header to ensure litespeed web server is in use instead of another web server, such as Apache.
Is cache root set on the server and virtual host level?
Follow the appropriate section of the server-level and virtual-host-level cache-root setup wiki.
For example: On a cPanel EA4 environment, you can use the following to check:
grep -i -r lscache /etc/apache2/*
You should be able to see the following. If not, you will need to set them up.
/etc/apache2/conf.d/userdata/lscache_vhosts.conf:CacheRoot lscache
/etc/apache2/conf.d/includes/pre_main_global.conf:CacheRoot /home/lscache/
Page Cache should be enabled under Cache Management
In System > Cache Management, refresh the “Configuration” and “Page Cache” cache types. “Page Cache” should be enabled, if not, then LiteMage can not work and LiteMage Cache Management stats won't show up.

Page is not cachable because of "cacheable" is set to "false"
If you followed every step in the installation wiki and still do not see the X-LiteSpeed-Cache: hit,litemage header for that page/for all pages, it is likely that the page is non-cacheable due to a setting from another plugin.
You can verify this by switching the Magento 2 full page cache setting from LiteMage back to the built-in cache and testing the header again. Most likely you won't see a cache header there either.
To find the plugin that is causing the conflict, navigate to the /app/ and /vendor/ (user can install modules under either app or vendor, that depends on how user installs it. if using composer, it will be in vendor directries, so both /app/ and /vendor/ directories should be checked), and execute the following command:
grep -r cacheable * | grep xml | grep false
Your output might look something like the following:
code/Mageplaza/SocialLogin/view/frontend/layout/customer_account_create.xml:        <block  class="Mageplaza\SocialLogin\Block\Popup\Authentication\Social" before="-" name="social-login-popup-authentication-social-create" ifconfig="sociallogin/general/is_enabled" template="Mageplaza_SocialLogin::form/social.phtml" cacheable="false"/>
code/Mageplaza/SocialLogin/view/frontend/layout/customer_account_login.xml:        <block class="Mageplaza\SocialLogin\Block\Popup\Authentication\Social" after="customer.new" ifconfig="sociallogin/general/is_enabled" name="social-login-popup-authentication-social-login" template="Mageplaza_SocialLogin::form/social.phtml" cacheable="false"/>
code/Mageplaza/SocialLogin/view/frontend/layout/default.xml:                    <block class="Mageplaza\SocialLogin\Block\Popup\Authentication\Social" name="social-login-popup-authentication-social" as="popup.authentication.social" template="popup/form/authentication/social.phtml" cacheable="false"/>
Here, cacheable=“false” from default.xml will prevent Magento from caching no matter which caching method is selected. Any page containing this block will be non-cacheable. If you see that layout/default.xml contains cacheable=“false”, then all pages on your Magento site will be considered non-cacheable.
Note: If you installed any 3rd party modules in the vendor directory, make sure to perform the above command again for that directory as well.
To fix this problem, you must disable the associated plugin or remove cacheable=“false” from the default layout. Just be aware that cacheable was probably set to false for a reason, and this method may cause the associated plugin to stop functioning correctly.
What if ''cacheable="false"'' appears somewhere other than ''default.xml''?
default.xml controls every page, but other layout files (.xml files) may override it for different pages, such as your home page, catalog pages, or product pages. When you check the header, you will need to check all of them to find out which pages are cached, which pages are not.
For example, you may notice that the home page is not cached, but catalog and product pages are cached ok. In that case, you will need to look for the template which controls the home page, which is not default.xml.
grep -r cacheable * | grep xml | grep false
design/frontend/Smartwave/porto/Magento_Theme/layout/cms_index_index.xml: <block class="Smartwave\Filterproducts\Block\Home\Recommend" name="recommend_product" template="Smartwave_Filterproducts::grid.phtml" cacheable="false">
In this case, cms_index_index.xml is the one which controls the home page and you will need to modify the Smartwave theme's cms_index_index.xml
Check the Facebook Plugin
The Facebook plugin is one of the common plugins to cause the Magento store to be uncacheable. You can check the /vendor/ or /app/ directory.
[root@Magento vendor]# grep -r 'cacheable="false"' * | grep xml | grep default
mgs/social/view/frontend/layout/default.xml: <block class="MGS\Social\Block\FacebookLikeBox" name="social.facebook.page.plugin" after="-" template="MGS_Social::fb-page-plugin.phtml" cacheable="false"/>
mgs/social/view/frontend/layout/default.xml: <block class="Magento\Framework\View\Element\Template" name="social.facebook.page.plugin.scripts" template="MGS_Social::scripts.phtml" cacheable="false"/>
Verify that Magento's built-in cache is working
LiteMage works similarly to Magento's built-in FPC cache. If you cannot see a LiteMage hit, you can verify if Magento's built-in FPC works. If FPC doesn't work either, then it is more likely that some plugins are making your Magento non-cachable, and it is not a LiteMage issue.
To verify Magento built-in FPC cache:
- You will need to run in developer mode. You can modify the doc_root
.htaccessby enabling(uncommenting) the following:SetEnv MAGE_MODE developer
- In Magento Admin > Stores > Configuration > Advanced > Full Page Cache > Caching Application, select
Built-in Cache.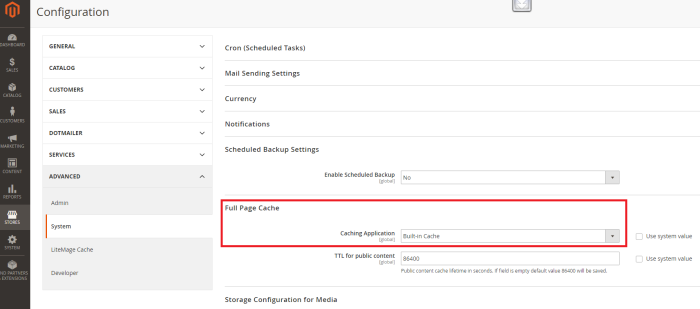
- Navigate to System > Cache Management and flush the Magento cache
- Open the Chrome or Firefox development tool first, then visit your Store URL. You should see:
X-Magento-Cache-Control: max-age=86400, public, s-maxage=86400
  X-Magento-Cache-Debug: MISS

- Visit the URL again, you should see:
X-Magento-Cache-Control: max-age=86400, public, s-maxage=86400
  X-Magento-Cache-Debug: HIT


If Magento FPC is working fine, you should see the above. However, if you could not see X-Magento-Cache-Debug: HIT, then there is something wrong with your Magento extension.
For example, if you always see X-Magento-Cache-Debug: MISS or X-Magento-Cache-Control: max-age=0, it means Magento's built-in cache cannot cache the page. If that's the case, LiteMage will have the same problem.

See cache-control and litespeed-tag headers but no miss or hit
When you check the header, you may see the following:

x-litespeed-cache-control:public,max-age=86400
This header indicates that the license is ok and the LiteMage plugin has been enabled, but the cache module is not working.
x-litespeed-tag:cms.B_porto_homeslider_1,store,cms.B,cms_page_35,cms.B_,cms.B_Willow_custom.B_for_header,P.1207,P,P.3746,P.1229,P.3635,P.3803,P.1162,P.3582,P.3820,P.1188,P.1322,P.1223,P.1133,P.4094,P.3977,P.1153,C.2,cms.B_Willow_footer_top_1_for_1,cms.B_Willow_footer_middle_1_for_1,cms.B_Willow_footer_middle_2_for_1
If cache module is working and that page is cacheable, you will always see x-litespeed-cache header, either miss or hit. If you only see x-litespeed-cache-control header but not together with x-litespeed-cache:miss, that means cache module not working properly.
For example: The above x-litespeed-tag header should always show up together with x-litespeed-cache:miss header. If not, it means something wrong with the setup. The common reason is a cache root permission problem. If there is a cache root permission problem, it means the cache file cannot be written or generated correctly.
The x-litespeed-tag problem can also be caused by incorrect cache root setup, or a license restriction such as you might have with a starter plan. This can be easily viewed in Cache Management LiteMage statistics. If cached object is 0, then it means there is a cache storage issue.
On a cPanel shared hosting environment, virtual host cache root is normally set to /home/$USER/lscache and it should be owned by nobody:user instead of user:user. If somehow you manually created this directory with user:user ownership, or you manually changed it to user:user ownership, there will be a cache module write permission issue as described above. You may also encounter the issue with some old cache files.
To fix the problem, remove the /home/$USER/lscache folder completely and restart the web server. The cache root folder (normally /home/$USER/lscache) will be created with correct ownership and permissions automatically during the restart. After restart, you should see the x-litespeed-cache:hit,litemage header.
LSCache Vary Cookie Problem Causing Cache Miss
Diagnose the Issue
With LiteMage2 enabled, open a brand new Chrome Incognito window to test the site and check the headers. You may see a cache vary cookie being set. This is a signal that the first visit from a new user sets a cache vary cookie but is not cached. On the second visit you might see cache miss, and a cache hit on the third.
If you do a few rounds of testing, make sure to close the incognito window completely and open a new window for each round. This is required to simulate a brand new user.
First visit:

Second Visit:

Third Visit:

Next, you can use another browser such as Firefox to simulate a different user and check the same page. On the first visit, you will see the cache vary cookie being set. The second visit, since the page has already been cached, you will see a cache hit. (If the page has not yet been cached, you will see cache miss on the second visit and cache hit on the third.)


There is an _lscache_vary set, which causes all new users' first visit to always be a cache miss.

For such a case, if you run a benchmark test through ab or curl, the result will be invalid, since the cache will never be hit: curl -I http://yourdomain.com/
HTTP/1.1 200 OK
X-Powered-By: PHP/7.0.31
Set-Cookie: store=he; expires=Thu, 15-Aug-2019 20:52:58 GMT; Max-Age=31536000; path=/; HttpOnly
Set-Cookie: PHPSESSID=8d10hs84hmc881dl014s00ffm6; expires=Wed, 15-Aug-2018 21:52:58 GMT; Max-Age=3600; path=/;
domain=carolinalemke.goomla.co.il; HttpOnly
Set-Cookie: wp_customerId=deleted; expires=Thu, 01-Jan-1970 00:00:01 GMT; Max-Age=0; path=/; domain=carolinalemke.goomla.co.il
Set-Cookie: wp_customerGroup=deleted; expires=Thu, 01-Jan-1970 00:00:01 GMT; Max-Age=0; path=/;
domain=carolinalemke.goomla.co.il
Set-Cookie: store_eu_ES=8d10hs84hmc881dl014s00ffm6; expires=Wed, 15-Aug-2018 21:52:58 GMT; Max-Age=3600; path=/;
domain=carolinalemke.goomla.co.il; HttpOnly
Set-Cookie: X-Magento-Vary=e3cb9ab3566a693edff3edf82caa39b1ed79e8ba; path=/; HttpOnly
Set-Cookie: searchReport-log=0; path=/; HttpOnly
Set-Cookie: _lscache_vary=9f858da3f6bbcc2862bc85d64d1b8ecb1bf2c076; path=/; HttpOnly
X-Magento-Tags: store,cms_b,cms_b_footer_secure_payment,cms_b_footer_develop_by,cms_b_promotional_mailings,cms_b_takanon,cms_p_2
X-Content-Type-Options: nosniff
X-XSS-Protection: 1; mode=block
X-Frame-Options: SAMEORIGIN
Pragma: no-cache
Cache-Control: max-age=0, must-revalidate, no-cache, no-store
Expires: Tue, 15 Aug 2017 20:52:59 GMT
Content-Type: text/html; charset=UTF-8
Date: Wed, 15 Aug 2018 20:52:58 GMT
Accept-Ranges: bytes
Server: LiteSpeed
X-UA-Compatible: IE=edge
Connection: Keep-Alive
Fix the Problem
To fix the problem, you will need to locate the plugin or toolbar that is causing the LiteMage cache vary.
In this example, we have found an accessibility plugin on the homepage which causes such a problem. You may have other plugins such as a currency switcher plugin, a language plugin or a geolocation plugin, which does the same.

The accessibility plugin can be further expanded to the following if you click it:

You will need to disable this type of plugin if you want a new user to hit the cache on their first visit.
If you still want to use the plugin, it is not going to be as bad as you may think. This issue only impacts a user's first visit to one page (not the first visit to each page). For the rest of the user's visits, all pages can be served from cache, presuming they have already been cached by previous visitors.
How to setup cache warm up for Magento 2 using LiteMage 2
Magento 2 warm up is not available yet. You could set public TTL to a longer time at this stage instead, for example 24 hrs, if applicable.